One common issue that many companies run into when they are trying to calculate their landed cost is that they receive their landed cost amounts months after they have received the inventory. By this time, they have closed their accounting periods in NetSuite and can not go back to update the landed cost natively on the Item Receipt. The solution below provides the steps to track an item’s average cost in this situation.
Want to learn more about landed cost? Check out this article that I wrote back in August of 2024 on Landed Cost and Implementing It in NetSuite.
Notes:
- Another popular issue that many companies run into is that allocating landed cost in multiple methods requires a lot of manual entry. This solution also provides a workaround for that.
- It can be useful to use Estimated Landed Cost and Contra Accounts to help track the variance. This portion of the solution is not covered in this article, but feel free to contact our team for assistance.
Landed Cost Solution Overview
To solve the issue, we use a Linked Item Receipt custom field on the Vendor Bill to help link the Landed Cost Vendor Bills back to the original correct Item Receipt. With these values, you can create NetSuite saved searches to calculate what value of the Landed Cost should allocated to each item (and per quantity). With these calculations, you can create a saved search that, at the end of each month, you export and then import to update the item’s average cost.
1: Linked Item Receipt Field on the Vendor Bill Record
This field should be filled in for any Bill record that has Landed Cost payments tied to it. This will ensure that the correct costs are being attributed to the Item Receipt.
2: Customizations on Landed Cost Cost Categories
For each Landed Cost Cost Category, you will want to customize the following:
Step 1: Custom Saved Search that pulls in the amount from the Vendor Bill.
Criteria:
- Type = Bill
- Item = Cost Category Other Charge Item
Results:
- Field: Amount
- Summary Type: SUM
- Function: Absolute Value
Available Filters:
- Linked IR
Step 2: Custom fields
The first custom field should be a field to hold the calculation from the saved search above.
- STORE VALUE = False.
The second field should be used to hold this value for reporting.
- STORE VALUE = True.
Step 3: A workflow should be created to copy the first field into the second field.
3: (Optional) Add Fields for Quantity-based Cost Allocation
If you want to allocate any of your costs by Quantity, you will need to create fields to calculate and hold the Sum of quantity. If you need help or guidance with this step, contact our team for assistance!
4: Create a Saved Search Calculating True Item Cost
Here is an example of a saved search that calculates the True Item Cost.

- This example has two Cost Categories: (1) Ocean Freight (allocated by quantity) & (2) Customs Duty (allocated by value).
- CD Per Item shows the total amount of Customs Duty attributed to the item line. The calculation shows the percent of the amount that this item makes up on the order and multiplies that by the total Customs Duty amount.
- CD Per Quantity shows the Customs Duty cost for each unit of that item. The calculation shows the percent of the amount that this item makes up on the order and multiplies that by the total Customs Duty amount divided by the quantity of that item on the order.
- OF per Item shows the total amount of Ocean Freight attributed to the item line. The calculation shows the percent of the quantity that this item makes up on the order and multiplies that by the total Ocean Freight amount.
- OF per Quantity shows the Ocean Freight cost for each unit of that item. The calculation shows the percent of the quantity that this item makes up on the order and multiplies that by the total Ocean Freight amount divided by the quantity of that item on the order.
- True Item Cost shows the item’s rate on the purchase + CD per Quantity + OF per Quantity.
5: Create a Saved Search for Import
Finally, you will need to create a second saved search to use as your import.
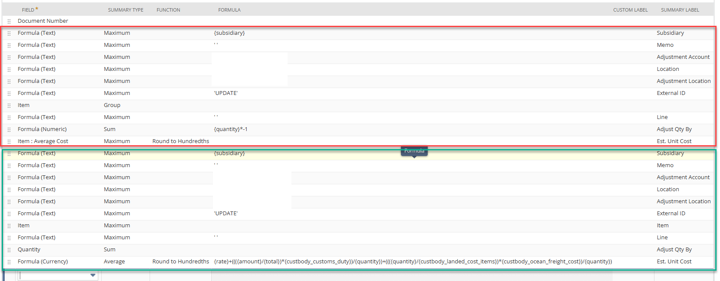
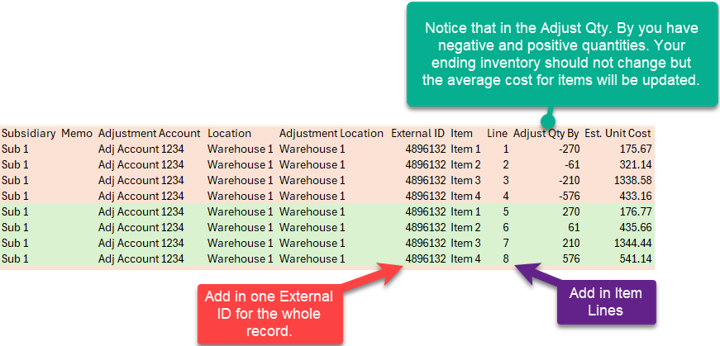
NOTE: We will be importing this as an Inventory Adjustment. We will have two lines for each item. The first line will show the quantity received in the last month * -1 and the Item’s current average cost. The second line will show the quantity received in the last month and the Item’s True Cost, calculated on the previous saved search. This allows the calculation to be weighted average.
- Here, you will want to hardcode in using Formula (Text), the required fields that will not be changing.
- You will need an empty field to add an external ID (this is mandatory for the import) and an empty field to add inline items.
- Each field will need to be included twice. On the import, you will copy the second half of the fields under the first set. Below, you see the set of fields that are tied with removing the inventory (red) and the other fields that will be used to add the inventory back at the True Item Cost for the month (green).

6: Running the Import in NetSuite
Step 1: Export the search above as a CSV.
Step 2: Copy the values in Green under the values in Red.


Step 3: Save the CSV file.
Step 4: Go to Setup > Import/Export > Import CSV File and complete a NetSuite CSV Import with the following settings in place:
- Import Type = Transactions
- Record Type = Inventory Adjustment
That's it; the issue should now be resolved!
Author: Jack Mannebach
Got stuck on a step in this article?
We like to update our blogs and articles to make sure they help resolve any troubleshooting difficulties you are having. Sometimes, there is a related feature to enable or a field to fill out that we miss during the instructions. If this article didn't resolve the issue, please use the chat and let us know so that we can update this article!
Oracle NetSuite Alliance Partner & Commerce Partner
If you have general questions about NetSuite or more specific questions about how our team can support your business, contact us! Anchor Group is a certified Oracle NetSuite Alliance Partner and Commerce Partner equipped to handle all kinds of NetSuite and SuiteCommerce projects, large or small.

