Looking for more in-depth SuiteCommerce training? Check out our FREE SuiteCommerce Admin training course!
Domain Record
The first record that we need to look at is the domain record. So we're going to go into Commerce > Hosting > Domains.
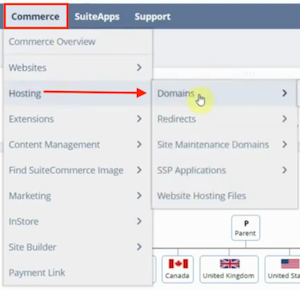
If you already have a domain setup, you can select it and click Edit. This will open up the domain record.
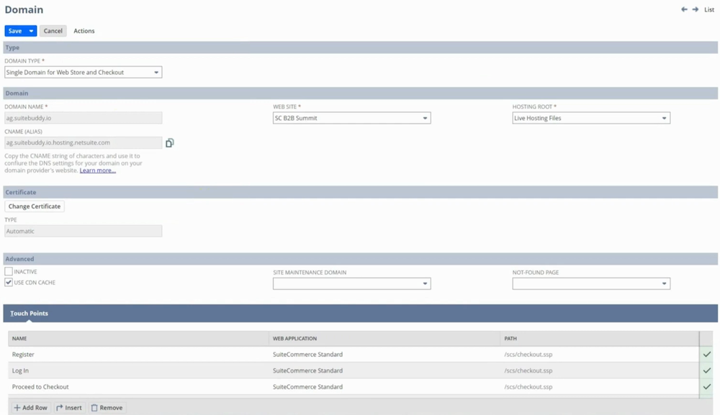
This is where you'll connect your domain to NetSuite. When you create your domain name on the domain record, it will automatically generate your CNAME alias. You'll have a DNS provider and need to upload the CNAME into the DNS settings to connect them.
Want to learn more about SuiteCommerce Domains? Check out our tutorial on How to Setup a SuiteCommerce Domain.
Website Hosting Files
Another common area you'll need to navigate to in this hosting section is your hosting files. So we'll navigate to Commerce > Hosting > Website Hosting Files.
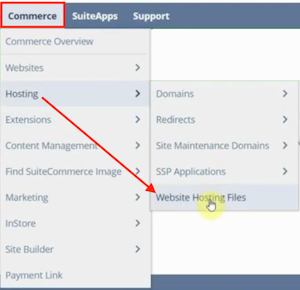
We will use CTRL+click to open this in a new window, and this is where those hosting files are. So if you've got a staging domain, you can create all those hosting files for your staging domain.
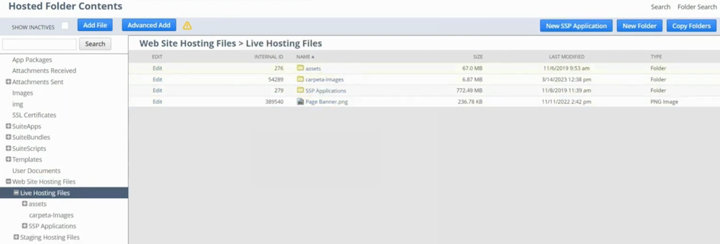
Your live hosting files, on the other hand, would be for your live website. This is where you're going to be when you add item images or add miscellaneous images for commerce categories; anything you may want to show on the website is commonly going to be within this folder.
Website Setup Record
The next thing we will show you is the website setup record. We're going to go to Commerce > Websites > Website List.
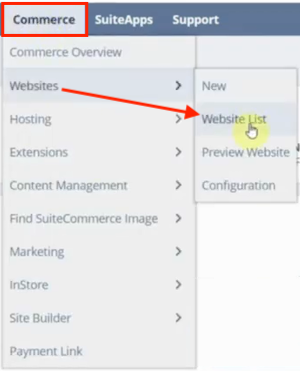
If you hadn't created a website setup record, you would need to create a new one now. But, for the sake of this tutorial, we will select one that already exists in our demo account and click Edit.
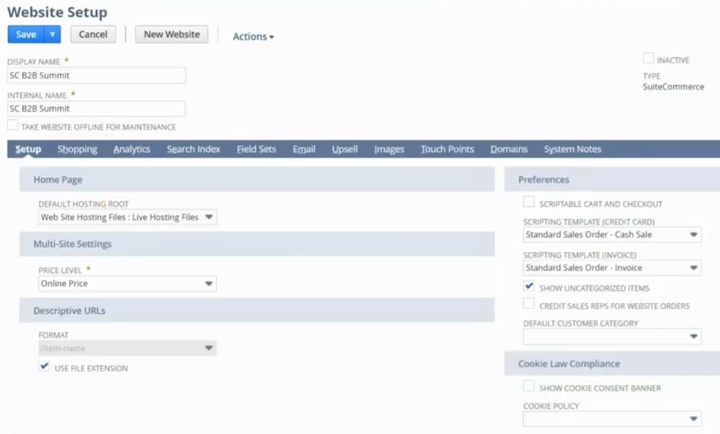
It's essential to understand what a website setup record is. There's only one website setup record for each SuiteCommerce license. Even if you have multiple domains on a single SuiteCommerce license, you still need to make sure your website setup record is consistent across all the domains and that the features are how you want them universally; otherwise, you need to buy additional SuiteCommerce licenses. Since that would be an expensive investment, you need to understand what the constants are. So let's go over some of the easy and common things people do in editing.
Cookie Consent Banner
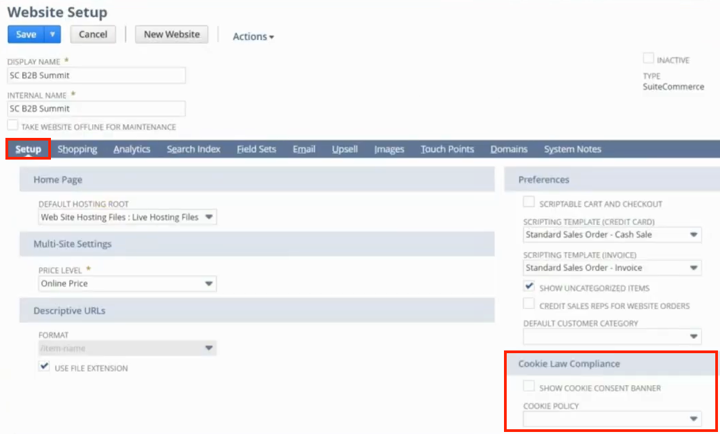
One of the things to consider is displaying a cookie consent banner on your website. On the Setup tab of the website setup record, there is a section on Cookie Consent Laws where you can check a box in order to Show Cookie Consent Banner. So you could check that, show the banner, and add a new file for your cookie policy.
Shared Cart
Another common thing for some sites is the shared cart. This option is located on the Shopping tab under Shopping Basics. This feature allows you to select whether all contacts for a given customer record share a cart or whether they all have individual carts.
If the shared cart feature doesn't provide the flexibility you need, Anchor Group has built customizations that you might want to explore, such as the dynamic cart extension Multi-Cart for SuiteCommerce or the SuiteCommerce Customer Swap feature.
Registration Page Settings
There are a number of settings located on the Shopping tab under the Registration Page section.
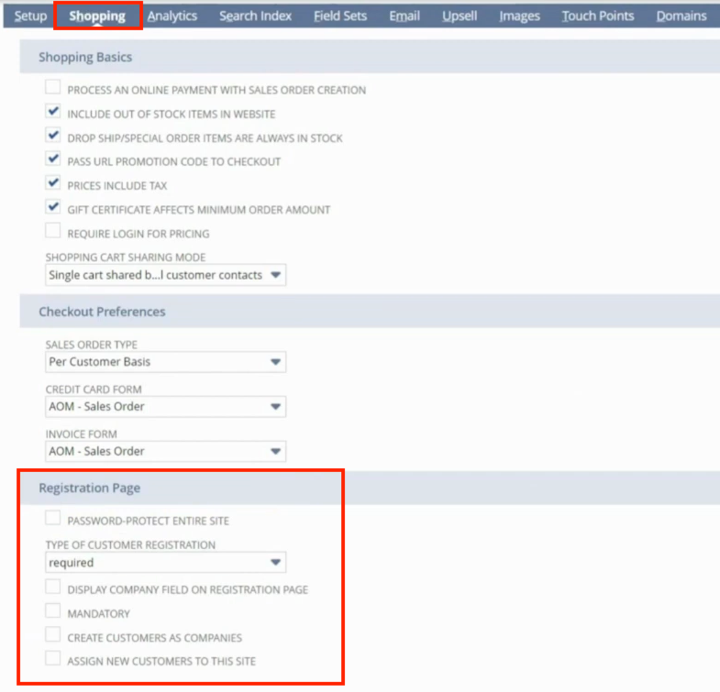
The setting to Password-Protect Entire Site locks all URLs and prevents them from being available unless the customer logs in.
For more details on password-protected sites and customer access, check out our tutorial article How to Give Someone Access to Your SuiteCommerce Webstore.
You can set the Type of Customer Registration to Optional for guest checkout. There are also options for things like creating customers as companies with contacts instead of individual customer records in NetSuite.
Search Fields
The Search Index tab is where you're going to manipulate your search fields, which are the fields being used in your website search bar.
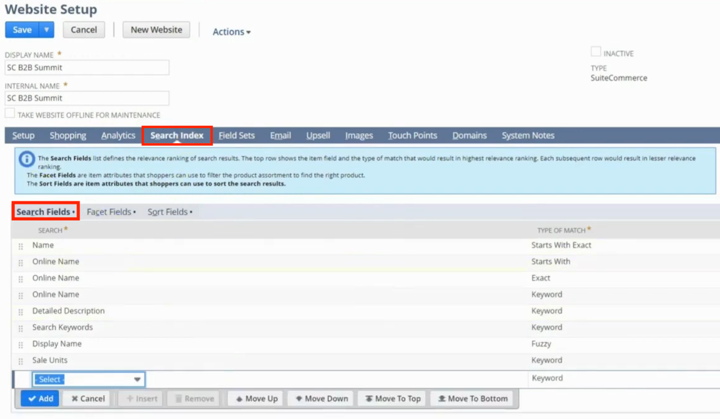
You can set this to return results for specific keywords, fuzzy match, starts with, and exact phrase in this particular field on the item record. There are quite a few fields that you can add here to make your search bar better and pull the direct results you want. There are extensions we can do on top of this to improve it, but this is the native functionality.
Facets and Sorting Options
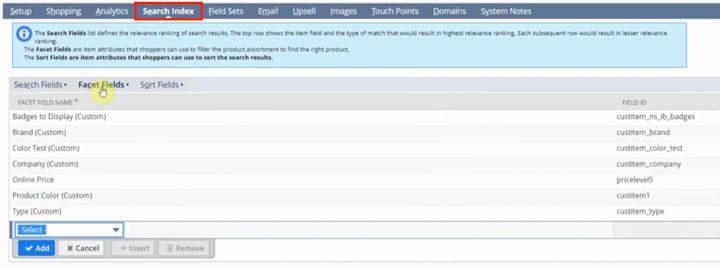
Next, we'll look at the Facet Field subtab on the Search Index tab. As you learn more about facets (which are your filters on the website) and start to create facets, this is one of the areas where you're going to configure them.
When you look at a product listing page of a SuiteCommerce site, you'll see a dropdown menu with sorting options like relevance, price low to high, and high to low. So let's say you wanted to sort by a specific field on the item record. You can select the internal ID and then sort by the order that you would like to show up as an option on the product listing page from the Sort Fields subtab, which is also located under the Search Index tab.
Emails
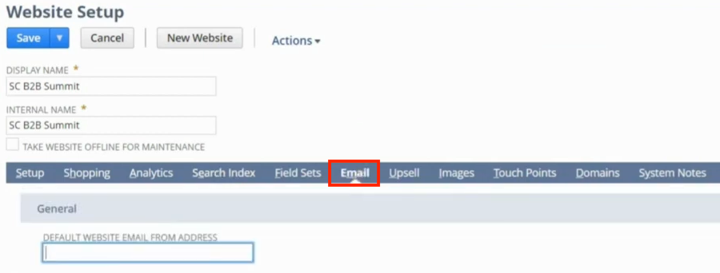
Next, let's look at the Email tab. Under the General tab, you can set a Default Website Email From Address that will apply to these standard emails.
Your default emails do not count towards your marketing email limits in NetSuite, which is around 10,000 a month or 420,000 annually as the common limit. Instead, these emails use a standard email template in NetSuite, which can be edited and manipulated with HTML and freemarker. It generally takes more time than you would think to edit and create a good email template, but there are some out-of-the-box ones that you can use.
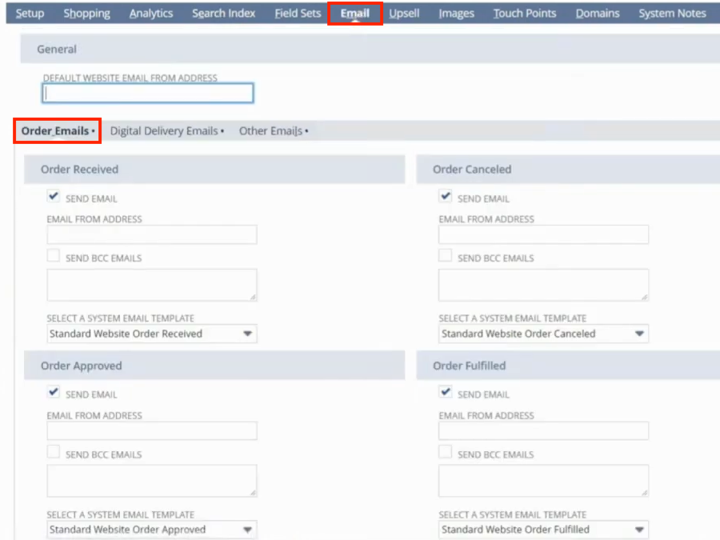
There are a handful of things in your email settings on the Order Emails subtab that you can adjust based on whether you want certain types of order emails to send or not. All we have to do is check the box that says Send Email next to the type of email that we want. You can designate the email address for each specific type of email, and if you want it to BCC different people at your company. These email options can be set for orders being received, approved, fulfilled, or canceled. You can make these same decisions about Digital Delivery Emails and Other Emails as well by navigating to those respective tabs.
Configuration Record
The next thing we're going to take a look at is the configuration record. We're going to go to Commerce > Websites > Configuration.
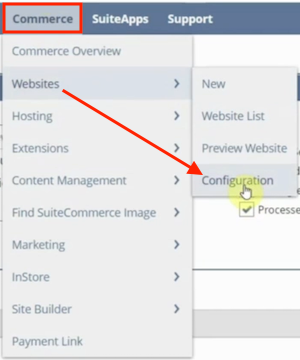
This is where you will configure different information for a specific domain. So we have to select our website setup record, and then our domain, and click Configure. We can copy this configuration to other domains to make it a little faster, but it will default here if you create a new one.
Learn how to copy or move a SuiteCommerce configuration record between sites, domains, and environments!
Your specific SuiteCommerce configuration may look a bit different, and you can create extensions that have unique configurable options. But here are a couple of pieces that we find are pretty common.
Navigation and Header Configuration
So let's go ahead and go to the Layout tab. This is where we will set up our header and all the different navigation options we can select. If you want to add your URL to your logo, you can add it here as well.

Default Product Image
Let's say you didn't have an image for a specific product. You can set a custom default image in your SuiteCommerce Configuration under Layout > Images.

So this could be a default image that shows up for items that have no associated images yet, rather than the site displaying a standard no-image found message.
Shopping Catalog - JSON-LD Markup
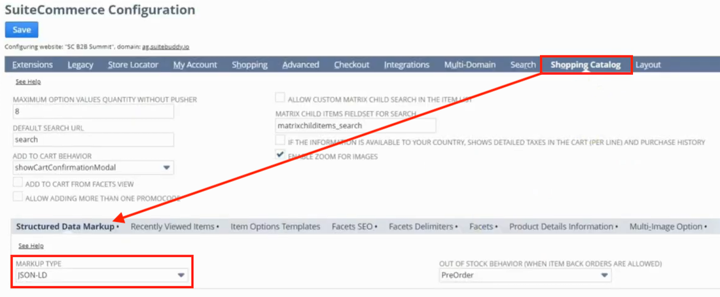
One of the most important things in the Shopping Catalog tab is under the Structured Data Markup subtab. If you want to have good SEO for your product detail pages (PDPs), you need to have JSON-LD selected for your markup type.
Configuring Facets
We discussed the website setup record and having different information available on the product listing page as facets. This Facets subtab under the Shopping Catalog tab is where we can set the name and title.
Want to learn how to create facets for your SuiteCommerce site? Check out this step-by-step Facets Fields Setup tutorial!
Search Tab
You can set up your Type Ahead functionality if you're using the search bar on the website, including how many characters are required for type-ahead suggestions to show.

The Results Sorting subtab is where you'll set your default sorting options on your product listing page. You can set them to default based on the screen size, since you may want certain sorting options on a desktop instead of on the phone.
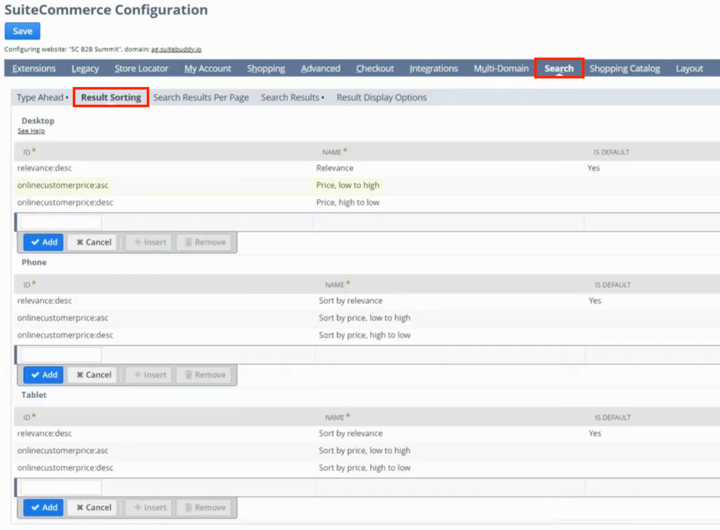
You can also look at the Result Display Options. Should you want to have list, table, and grid as options on desktop, but only list and table on mobile, you can set that up here.
Want to learn more about setting up sort options for your webstore? Check out this tutorial article on Item Sorting in SuiteCommerce!
After you make a selection or change to any part of the configuration, be sure to save the record! There are quite a few other settings and features to look at on the SuiteCommerce Configuration Record, but we won't go over every one of them here since this is just an introduction to the most common SuiteCommerce Administrator tasks. Remember also that configuration settings can be variable based on your extensions.
Extension Manager
The last piece we will go into is the extension manager, which you can access by navigating to Commerce > Extensions > Extension Manager.
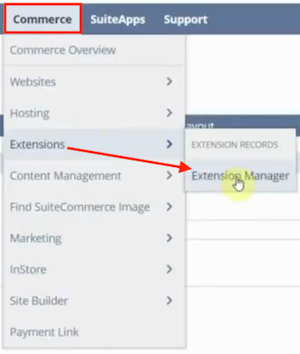
This will open a page showing all the themes or extensions for a specific domain. You'll notice we are automatically taken to this first section labeled Active Themes & Extensions.

This is where you can see everything that is currently active, whether it is a SuiteCommerce theme or an extension. If you click over into the Themes or Extensions tabs, you can explore all the installed themes and extensions respectively, regardless of whether they are active.
Need a refresher on installing theme bundles or bundled extensions? Check out this tutorial article on How to Search and Install Bundles!
To activate a theme or extension, go to the relevant tab, select what you want, and click Activate. It will take probably 15 minutes or so to activate it, and in the meantime it will show a Pending status. If you refresh the page after a few minutes, it will likely show a status of In Progress and the number of steps completed.
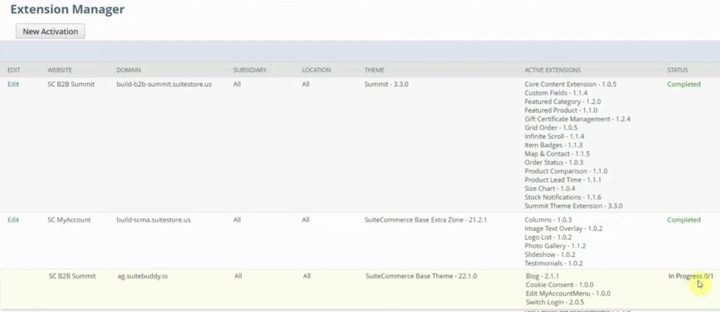
Once it's done, it'll say Completed! After you see that it is done, be sure to complete a cache invalidation request.
Note: Some extensions will make things more configurable. You may have to go back into your SuiteCommerce configuration record to be sure everything is set up the way you want it if it's the first time you're activating a specific extension.
FREE SuiteCommerce Admin Training Course
Well, that's it for this tutorial! If you want to keep learning SuiteCommerce Admin skills, check out the FREE SuiteCommerce Admin training course created by our in-house experts here at Anchor Group. The content of this article actually comes from the first lesson of the course, so you've already had a preview!
The SuiteCommerce Admin course is a short collection of lessons meant to help individuals already familiar with NetSuite learn the skills needed to help manage a SuiteCommerce site. If you aren't already comfortable working in NetSuite, we recommend completing our FREE NetSuite Beginner course before moving on to the SuiteCommerce course.
Oracle NetSuite Alliance Partner & Commerce Partner
If you have general questions about SuiteCommerce or more specific questions about how our team can support your business as you implement NetSuite or SuiteCommerce, feel free to contact us anytime. Anchor Group is a certified Oracle NetSuite Alliance Partner and Commerce Partner equipped to handle all kinds of NetSuite and SuiteCommerce projects, large or small!
We are a premium SuiteCommerce agency that creates powerful customer portals. Unlike our competitors, we have already solved your problems.
FREE NetSuite Ecommerce Book
Here at Anchor Group, we pride ourselves on having the heart of a teacher! Offering free training content that helps users learn to get the most out of their NetSuite and SuiteCommerce systems is just one way that we follow through on that value.
If you haven't yet, be sure to snag a free copy of our SuiteCommerce book which we will ship for free to any address in the United States mainland!
