
NetSuite CPQ (Configure, Price and Quote) is an add-on module that NetSuite users can leverage to quickly configure complex and accurate products or services directly within NetSuite. CPQ is integrated directly in the NetSuite environment and can also be integrated with ecommerce solutions such as SuiteCommerce or Shopify.

CPQ in a SuiteCommerce Webstore

Within the SuiteCommerce Configurator
Let's explore CPQ in greater depth and learn how to integrate it with a SuiteCommerce store!
What is NetSuite CPQ?
CPQ is not a common feature for SuiteCommerce implementations, but when it comes up, it is important. Originally a collection of bundles that were installed into an environment, this feature has now become a SuiteApp.
As of this article's writing, not all of the CPQ documentation has caught up to the SuiteApp version released in early 2023. Some of the CPQ documentation refers to installing multiple bundles. To access the most recent version of CPQ, install a SuiteApp, as described below.
The remainder of this article will focus on the CPQ Integration into SuiteCommerce.
CPQ Integration to SuiteCommerce
CPQ modules (items) natively surface to the SuiteCommerce webstore as any other NetSuite item record would.
To verify that you have take the correct steps to display items to the webstore, check out this article that my temmate Collin wrote back in 2024: How to Add Items to Display in a SuiteCommerce Webstore
Prerequisites
Verify that the following bundles (bundle) or SuiteApps are installed and updated:
- SuiteCommerce / SuiteCommerce Advanced 2020.2 release or later (bundle)
- SuiteCommerce Base theme (bundle)
- So far, our team has discovered that the Threads theme also surfaces CPQ.
- SuiteCommerce Extension Manager 2022.1 or later (bundle)
- NetSuite CPQ Configurator SuiteApp
Instructions to Surface CPQ to SuiteCommerce
The following steps need to be taken to configure CPQ to the webstore:
Enable Features
- Click Setup > Company > Enable Features – SuiteCloud tab.
- Check the following checkboxes and hit save upon completion:
- Item Options
- Client SuiteScript
- Server SuiteScript

Navigate to Enable Features

Enable Features
Scriptable Cart and Checkout
- In the Website Setup Record, (Commerce > Websites > Website List), navigate to the Setup Tab.
- Check the “Scriptable Cart and Checkout” checkbox and save the website setup record.

Website Setup Record
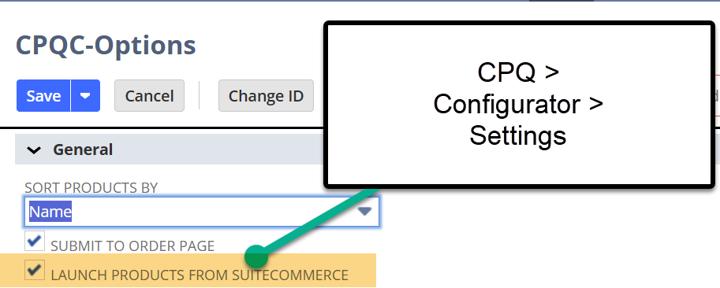
Enable Launch Products from SuiteCommerce
- This step ‘turns on’ the CPQ modules or items to be surfaced to the SuiteCommerce Webstore.
- Navigate to CPQ > Configurator > Settings.
- Check the “Launch from SuiteCommerce” Checkbox and Save.
Make Items Available on SuiteCommerce
- From an item level, you can make items or modules available for the user to configure, price, or quote. Here is how:
- Navigate to CPQ > Configurator > Product Maintenance and select the item you desire to edit.
- Check the “Available on SuiteCommerce” checkbox. Save this Record.

Install and Activate the CPQ SuiteApp Extension
- This SuiteApp Extension needs to be provisioned from NetSuite. If not provisioned, you will not be able to install the SuiteApp. If that is the case, please reach out to your NetSuite rep to get this SuiteApp provisioned.
- Navigate to Customization > SuiteCloud Development > SuiteApp Marketplace. Once there, search for “CPQ SuiteCommerce” and the SuiteApp should surface. Click on it.
- Select the blue “Install” button if not already installed.

This information is NOT currently listed on the NetSuite documentation clearly. Please do not skip this step:
4. In the Extension Manager, Activate the CPQ SuiteApp as you would any other NetSuite bundle.
For more information on activating bundles with the Extension Manager, check out the article I wrote in 2024 on Activating the Extension Manager.

Extension Manager
Configure from the Configuration Record
- Navigate to the Configuration Record by clicking Commerce > Websites > Configuration. Select your site and domain and navigate to the Extensions Tab.
- Here you will see the CPQ Subtab - there are many fields in this page, and this linked NetSuite documentation, as well as the field help, explain what each field manages on the store.
Attach the CPQ Module to the Inventory Record
- On the Inventory Record in the Custom tab, there are three custom fields that should surface.
- If the company is using a custom form, you may need to add these fields to the custom inventory form.
- The most important field is the “CPQ-Product Configurator” field, as that field attaches the CPQ Module to the Inventory Record.
- Lastly, go to the Webstore tab, and double-check that the ‘Display in Webstore’ checkbox is checked.
- Save the Item Record, return to your site, and you should be able to enter CPQ from your SuiteCommerce Webstore!
Author: KC Daniels
FREE SuiteCommerce Book
If you liked this article, you'll LOVE our book on SuiteCommerce! Order the free SuiteCommerce book today, and we'll even pay for shipping!
Oracle NetSuite Alliance Partner & Commerce Partner
If you have general questions about SuiteCommerce or more specific questions about how our team can support your business as you implement NetSuite or SuiteCommerce, feel free to contact us anytime. Anchor Group is a certified Oracle NetSuite Alliance Partner and Commerce Partner equipped to handle all kinds of NetSuite and SuiteCommerce projects, large or small!

We are a premium SuiteCommerce agency that creates powerful customer portals. Unlike our competitors, we have already solved your problems.