
We had a client looking for a means of pulling purchase order transaction lines into an Excel file that they could email to their vendors. You could build the NetSuite saved search, and all might seem well. But if you're like our client, you might sometimes change the item descriptions on the purchase order lines, and the saved search will not reflect those changes.


The reason the search results may not reflect these changes is that you cannot show the item sublist > item description field in your search results. You can only pull in the item description from the item record.
However, you can create a quick workaround using a custom field and a NetSuite workflow. At a high level, the workflow sets the value of the custom field to the value of the field you need. Then, you can access the custom field in your saved search.
Step 1: Create a Custom Transaction Line Field
First, you need to create a custom transaction line field (Customization > Lists, Records, & Fields > Transaction Line Fields > New)
Step 1: Give the field a name (label) and ID.
Step 2: Provide a description you can copy/paste into the help field.
Step 3: Set the field Type to Text Area or Free Form/Text.
Step 4: Check the ‘Store Value’ checkbox. (This will allow you to see the field value in search results)
Step 5: Display Type - You have options depending on the client's needs (see below)
Display Type Options
- Normal—The field will be displayed on the transaction form and editable.
- Disabled—the field will display on the transaction form but will not be editable. (Note: For my client, I chose disabled. That way, they could add it to custom forms if they wanted to, but users could not update the field on the transaction record.)
- Hidden—The field will not be displayed on the transaction form but is still part of the page. (Note: If a custom field is marked as hidden, it cannot be added to custom forms. Also, the custom field is unavailable in the Fields list when customizing the form.)
Step 2: Create a Workflow
Second, you will need to create a workflow after creating the custom field. (Customization > Workflow > Workflows >New)

Step 1: Give the workflow a name and ID.
Step 2: Set the Record Type = Transaction
Step 3: Record Sub type = Purchase Order
Step 4: Description = up to you.
Step 5: Initiation = Event Based
Step 6: Select an Event Definition:
- On Create = yes
- On View or Update = yes
- Trigger Type = After Record Submit
- Event Types = Select All
- Context = Select All

This will be a single-state workflow.
Define a Sublist Action Group:
- Parameter = Items
- Trigger On = After Record Submit
- Event Types and Contexts = All
Define an action:
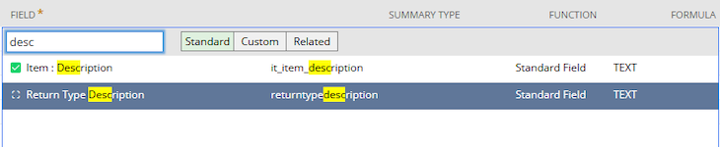
Step 1: Action = Set Field Value
Step 2: Parameters (Set the custom field to the value of Line = Description)
Step 3: Event Types and Contexts = Select All
The custom field retains whatever the current value of the item description is on the purchase order item line.

Author: Jordan Spinharney
Got stuck on a step in this article?
We like to update our blogs and articles to make sure they help resolve any troubleshooting difficulties you are having. Sometimes, there is a related feature to enable or a field to fill out that we miss during the instructions. If this article didn't resolve the issue, please use the chat and let us know so that we can update this article!