

On a custom record, a client of ours wanted the ability to restrict the use of multiple fields based on other fields being filled in. This was to prevent entering conflicting information that would cause issues with a script and the client’s pricing procedures.
To prevent entry in the specific fields, we created a workflow that sets the field display type and can revert the record back to normal if a field is emptied during record creation! Here are the steps we took to achieve this.
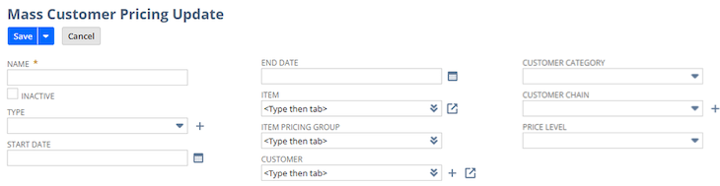
Conditional Field Display Restriction in NetSuite
In the case of our client, when an Item is selected, we want to disable the Item Pricing Group. The same rules apply to the customer fields on the custom record.
- When Customer is selected, we want to disable Customer Chain and Customer Category.
- When Customer Chain is selected, we want to disable Customer and Customer Category.
- When selecting the Customer Category, we want to disable the Customer and Customer Chain.
We also want the ability to reactivate the disabled fields if the user empties one of the triggering fields.
How to Create Conditional Field Display Rules in NetSuite
To accomplish this, create a workflow for the custom record type that runs on create view or update.
This will be a single-state workflow with multiple actions and conditions.
The actions will all be Set Field Display Type with conditions applied. You will use Trigger On “After Field Edit” for all actions.
Here, I will only use the example of restricting the Item Pricing Group field when an Item is filled and how to reactivate that field.
Creating a NetSuite Workflow for Field Display Rules
In the first action of Set Field Display Type, select trigger on “After Field Edit” and select Item or the field you would like to trigger on. Then select the field you would like to restrict in the parameters section and set the display type to “Disabled.”


In the second Set Field Display Type action, select trigger on “After Field Edit” with the same triggering field as step 1. Then, add a condition stating, “Triggering Field Is Empty.” Then select the field you restricted in step one and set the display type to “Normal.”
You must enter the condition correctly; otherwise, the field will not be reactivated when emptying the triggering field.


When an Item is selected in the custom record, the Item Pricing Group is disabled. Then, if the item field is cleared, the Item Pricing Group is reactivated.

Author: Kevin Ronczkowski
Got stuck on a step in this article?
We like to update our blogs and articles to make sure they help resolve any troubleshooting difficulties you are having. Sometimes, there is a related feature to enable or a field to fill out that we miss during the instructions. If this article didn't resolve the issue, please use the chat and let us know so that we can update this article!
Oracle NetSuite Alliance Partner & Commerce Partner
If you have general questions about SuiteCommerce or more specific questions about how our team can support your business as you implement NetSuite or SuiteCommerce, feel free to contact us anytime. Anchor Group is a certified Oracle NetSuite Alliance Partner and Commerce Partner equipped to handle all kinds of NetSuite and SuiteCommerce projects, large or small!
