Purpose: Bulk upload commerce categories and their items for the SuiteCommerce webstore.
Commerce categories are a native NetSuite feature to organize items in your SuiteCommerce site. Categories can be accessible through your site's navigation bar, and are also available under higher-level "parent" categories. However, if you have many items and many commerce categories, manually creating each individual record is time-consuming. Fortunately, we can use NetSuite's CSV Import feature to make the process more efficient.
.
Brainstorm Website Structure
Your website items will be divided into categories. Each category can be subdivided into more categories. Bottom-level categories will contain items. Categories keep your site organized and easy to navigate.
When you are deciding how to organize your website, keep in mind the following guidelines:
- The recommended maximum number of levels in the hierarchy is 3. 4 can work, but isn’t best practice.
- The recommended maximum number of categories is somewhere around 100-150. More than that begins to bog down your site and cause performance issues.
.
Create Catalog
All the commerce categories for your site will go into one Catalog. Think of each Commerce Category as a page in one big catalog.
To view your Commerce Catalogs, navigate to Commerce > Content Management > Commerce Catalogs.
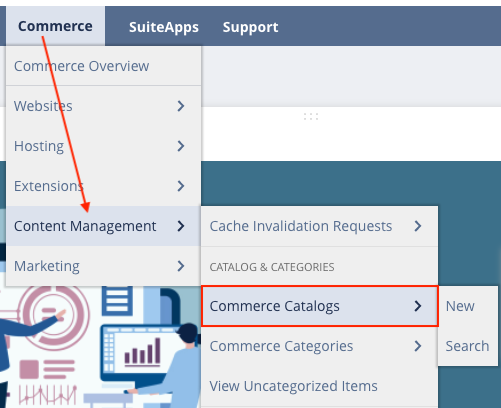
There may already be a catalog for your website. If not, click "New Commerce Catalog" and create one:

.
Create a CSV Template File
Open up Excel or your favorite spreadsheet software, and add the following column headers:
- External ID
- Name
- Description
- URL
- Display in Web Site
- Page Title
- Primary Parent
- Commerce Catalog
- Start Date
- End Date
- Commerce Category Items: Items
- Commerce Category Items: Primary Category
Save this file for future use as a template.
.
Add Category Data to the CSV Template File
Using a copy of the template you built in the previous step, begin filling in the columns with your category and item data. A few notes on this...
- External IDs are set at your own discretion, but we typically assign a sequence of integer numbers to the External ID column
- Description is optional
- URL fragments must all be lower-case. An example of this is shown below
- Display in Web Site should almost always be checked as 'Yes'
- If you would like the category to only become available at a certain time or to stop being available at a certain time, use the Start Date and/or End Date fields
- Primary Parent – this is the commerce category to which this category is a child. This will be blank for top-level categories.
- Commerce Catalog – this should be the catalog that was found or created above.
- Note that the Commerce Category Items columns will remain blank for category rows, as these are used only when importing items.
Remember to double-check your work! When you are done, save the spreadsheet as a CSV file. It should look something like this:

In this example, “Shirts” and “Pants” are the commerce categories. They are the parents of the subcategories “Tees”, “Polos”, “Jeans”, and “Khakis”.
Note: We’ve had the best luck with dividing the import file into several files, one for each level of category. That is, first we import the file with all the level 1 categories, and then we import the file with all the level 2 categories under them, etc. We’ve run into issues trying to import multiple dependent levels at one go.
After the category imports themselves, we can use the same import template to import a new file that adds items to their respective categories.
.
Import Categories via CSV
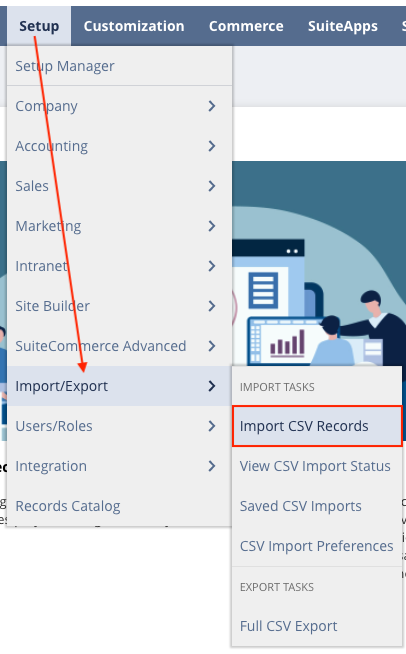
Navigate to "Import CSV Records" at Setup > Import/Export > Import CSV Records.
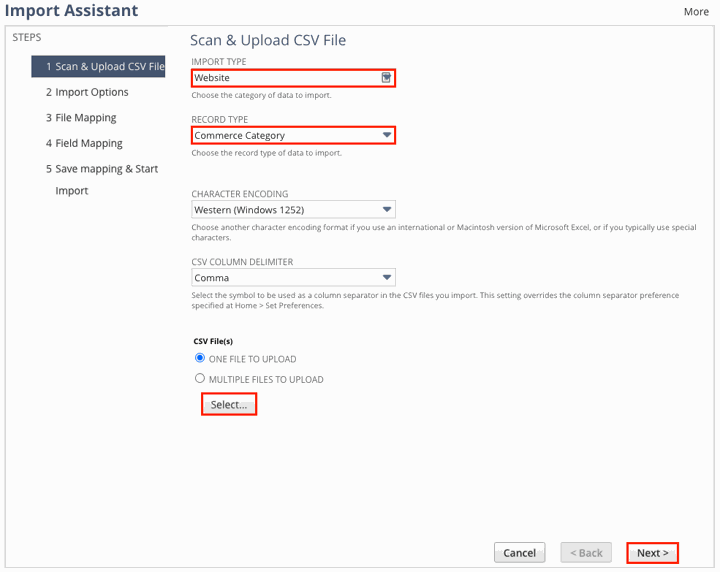
Set the import type to "Website" and the record type to "Commerce Category".
Select the CSV file of commerce categories that you want to upload. Start with the file that has the level 1 categories.
Click "Next".
Select the data handling type:
- Select "Add" if all imported records are new
- Select "Update" if the import is meant to alter existing records
- Select "Add or Update" if the imported records are a mix of both new and existing records, or if you are unsure about whether some of the records already exist.
Click Next until the “Save mapping & Start Import” page. (Since you are only importing one file at a time, you will skip File Mapping.)
Establish the field mapping between your CSV columns and the appropriate Commerce Category field options in NetSuite.
Click "Next".
On the "Save mapping & Start Import" tab, complete the provided fields to label your import for future use, then click "Save & Run"!
.
Confirm Category Import
View the Commerce Categories at Commerce > Content Management > Commerce Categories to confirm that your information is uploaded as desired.
.
Add Item Data to the CSV Template File
You can add items manually from the commerce category record if desired. However, items can be also be added to commerce categories via the same saved CSV that you just used for adding or updating commerce categories.
To add an item under a commerce category, enter in the desired data into its respective column of the CSV template. Use the following tips to guide this step:
- Set the "External ID" of the row to the external ID of the category you want to add the item to
Note: If your commerce categories were added manually, then they don’t have external IDs. The easiest way to solve this is to create a saved search of all the commerce categories, export the results, copy the internal ID values into the external ID column, and then import the resulting CSV file to update the external id field of the categories.
- Besides the External ID field, all other fields we used to create commerce categories will stay blank.
- Set the "Commerce Category Items: Item" field to the item name/number of the item that you want to add
- Set the "Commerce Category Items: Primary Category" field to a "T" or an "F" for true or false. The primary category that the item belongs to is the category that the item will show up under in its PDP breadcrumbs. An item can belong to multiple categories, but only one primary category.
- If you want to add an item to multiple categories, you will need that item to show up on multiple lines in your CSV file, one line per category.
Here is an example of importing multiple items into multiple commerce categories using our import CSV.

Notice that tshirt02 is added to multiple commerce categories. Only one of them is the primary category, though..
.
Import Items via CSV
For this step, you will follow the same process as you did for your Category Import. For more details you can revisit the category import section above, but we have provided the same steps in a condensed view here:
- Navigate to "Import CSV Records" at Setup > Import/Export > Import CSV Records.
- Set the import type to "Website" and the record type to "Commerce Category".
- Select the CSV file of items that you want to upload to your commerce categories. Click "Next".
- Select the data handling type "Add or Update".
- Click Next until the “Save mapping & Start Import” page.
- Establish the field mapping between your CSV columns and the appropriate field options in NetSuite. Click "Next".
- On the "Save mapping & Start Import" tab, complete the provided fields to label your import for future use, then click "Save & Run"!
.
Confirm Item Import
Once you’ve imported your items, you can check to make sure they were imported successfully.
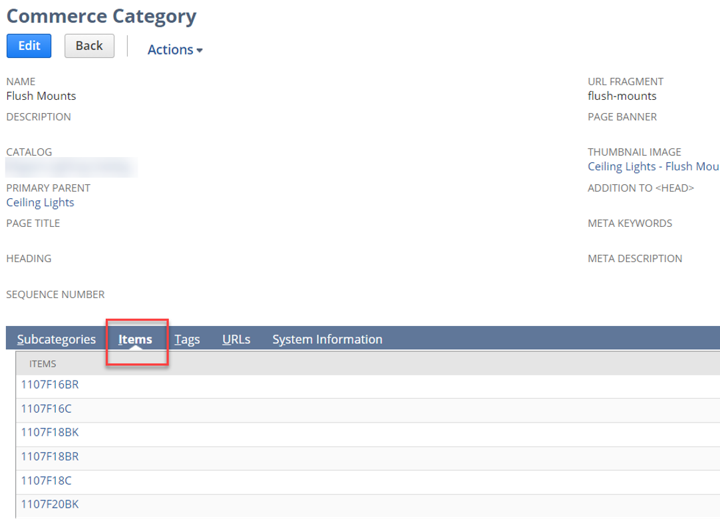
View the Commerce Categories at Commerce > Content Management > Commerce Categories. Select an individual commerce category that should have received items. You should find the items under the Items subtab.
.
VIDEO: Commerce Category Tutorial
To learn more about working with commerce categories, check out this tutorial video:
Get stuck in a step during this article?
We like to update our blogs and articles to make sure they help resolve any troubleshooting difficulties you are having. Sometimes there is a related feature to enable or field to fill out that we miss during the instructions. If this article didn't resolve the issue, please use the chat and let us know so that we can update this article!
.
FREE SuiteCommerce Book for Continued Learning!
Want a free paperback copy of this NetSuite e-commerce book? We even pay for shipping... Order the free SuiteCommerce book today!
