Depending on your country or industry, your company may need to adjust the transaction numbering format in NetSuite. The native Auto-Generated Numbering system allows NetSuite users with the Admin role this ability to customize the transaction naming convention.
Note: Auto-generating numbers is synonymous with Advanced Transaction Numbering. Most commonly, you can recognize this is setup in a NetSuite environment when you see a prefix “XX-SO0001” or suffix “SO0001-XX”.
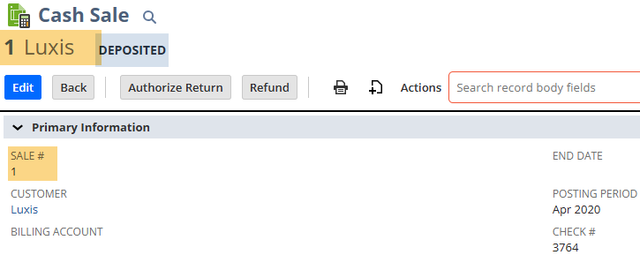
Before Auto-Generating Transactions
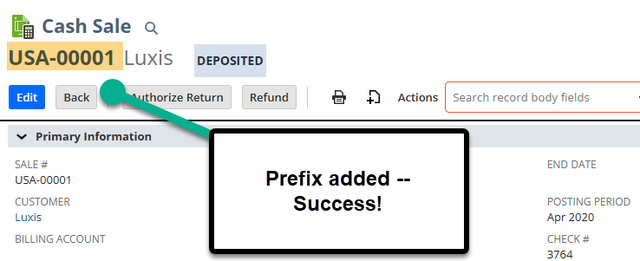
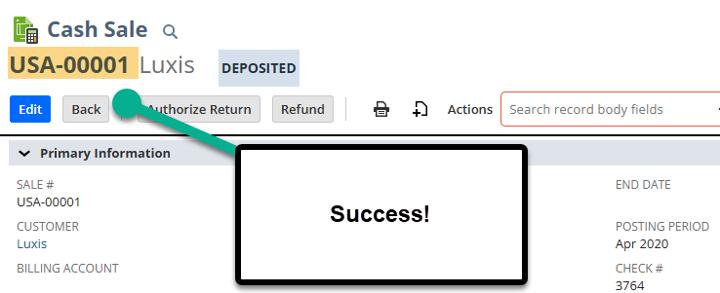
After Auto-Generating Transactions
Some Use Cases for Advanced Transaction Numbering
There are a variety of use cases for leveraging advanced transaction numbering in NetSuite. Here are a few common ones:
- Industry or Country standards dictate your company changing the naming conventions of Sales Orders.
- Your company wants this for faster accounting reconciliation
- The Customer wants to rename specific invoices for the Custom Surcharge / Credit Card Fee extension. (This was our use case in this scenario.)
Configuring Auto-Generated Transaction Numbers
Follow the below steps to initiate the Auto-generating numbers function in your NetSuite account.
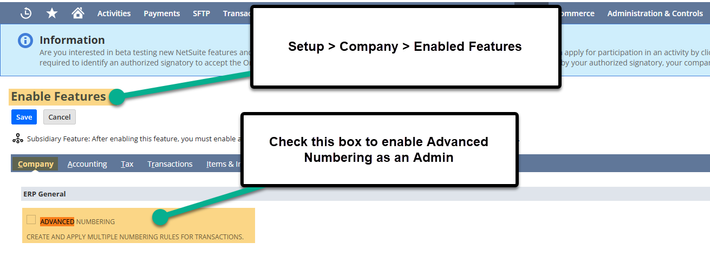
Step 1: Enable the Advanced Numbering feature in your NetSuite account.
- As an administrator, Setup > Company > Enabled Features – Company Subtab. Check the “Advanced Numbering” checkbox.
Need a refresher on how to Enable NetSuite Features? Check out the article Enabling Features in NetSuite, which was written by my teammate Caleb back in July of 2022!
Step 2: Verify that your role has the proper permission – Admin Roles or roles with at least ‘View’ level of “Auto-Generated Numbers” permission found in the Setup tab on the user’s role.
Want to learn more about working with roles and permissions? Check out this tutorial article (& video) on NetSuite User Roles & Permissions, which was written by my teammate Caleb back in November of 2022!

Step 3: Configure your settings based on the specified characteristics that your customer requires from the “Setup Auto-Generated Numbers” page.
- Navigate to Setup > Company > Auto-Generated Numbers > Document Numbers tab.
- Edit the desired transaction with prefixes and suffixes and define if the transaction should follow the “Use Subsidiary” rules.
- If you want to update the existing documents to match the same naming convention, check the far right checkbox “Update”.

Note: It is recommended to use the Subsidiary rules, especially if there are multiple subsidiaries within your NetSuite environment and there are different rules that apply to each subsidiary.
Step 4: Save the page and return to the transaction you edited to ensure that the advanced numbering is displaying as desired.
Author: KC Daniels
Got stuck on a step in this article?
We like to update our blogs and articles to make sure they help resolve any troubleshooting difficulties you are having. Sometimes, there is a related feature to enable or a field to fill out that we miss during the instructions. If this article didn't resolve the issue, please use the chat and let us know so that we can update this article!
Oracle NetSuite Alliance Partner & Commerce Partner
If you have general questions about NetSuite or more specific questions about how our team can support your business, contact us! Anchor Group is a certified Oracle NetSuite Alliance Partner and Commerce Partner equipped to handle all kinds of NetSuite and SuiteCommerce projects, large or small.
