

We know that working with SuiteCommerce images can be tricky, especially if you are implementing SuiteCommerce for the first time or if you are working to troubleshoot image issues on a heavily customized SuiteCommerce website.
This article provides a comprehensive overview of working with images across a SuiteCommerce site! If you encounter any problems along the way and would like to talk to a NetSuite consultant, contact our team!
Where SuiteCommerce Images are Stored
The Website Set Up Record dictates where your site images will be stored. To navigate here, follow the click path to add your item images.
- Commerce > Websites > Website List – select “Edit” on your site.
- In the Images tab, you will see the Image Folder dropdown.
- Select the folder where the site’s images will be stored. Select “Save”.

SuiteCommerce Favicon

Anchor Group SuiteCommerce Favicon
What: A favicon is a small icon on your browser page.
Why: Adding the favicon customizes your site to your logo and boosts confidence and consumer trust when customers purchase from your store.
Where: This image is adjusted from the File Cabinet. Follow this click path to find your activated SuiteCommerce theme and favicon image.
To find your site’s active theme version, follow this click path:
- Click Commerce > Extensions > Extension Manager and scroll until you see your active site.
- In the “Theme” column, note the version of the activated theme for your site. In this case, it is “23.2.3"

How to Adjust: Users have two options when adjusting the favicon on their SuiteCommerce site:
- Replace the existing Favicon
- Create a new Favicon Image file
Our tutorial article, "How to Add a Custom Favicon to a SuiteCommerce Site", outlines the step-by-step instructions for both methods.
NOTE: Favicons can be incredibly finicky, especially if multiple theme bundles have been downloaded. Persistence is key when replacing the existing favicon!
SuiteCommerce Home Logo
What: The home logo helps customers recognize your site, allowing users to return to the SuiteCommerce site’s homepage quickly and effectively.
Where: This file change is made in the File Cabinet by replacing the active theme’s “SC Logo”. See the blue box in the “Favicon” section to find your site's theme.
How to Adjust:
- Navigate to your site. Right-click on the homepage and hit “Inspect” in Chrome.
- Highlight the home logo class (orange box) to see where the file is stored. In this case, the folder path for this home logo is in the “23.2.3” folder > “img” folder and name “SC_Logo”.
- Navigate to the File Cabinet by clicking Documents > Files > File Cabinet.
- On the left, you should see a search bar. Type in your folder version number, in this case, “23.2.3”.

- Click through the “Img” folder.
- Find the “SC_Logo.png” file and select “Edit”.
- Once you edit the file, you should see a “Select File” field. Replace your Home Logo file here, then hit “Save.”
- Commit a cache invalidation request and hard refresh the page (Ctrl + Shift + R). You should see your logo updated!
- Navigate to the Configuration Record (Commerce > Websites > Configuration)
- Select your Site and SuiteCommerce Domain and navigate to the Layout tab.
- In the " Logo URL " field, add the URL from your “SC_Logo” file in the File cabinet.

URL of the SC_Logo File in the File Cabinet
Main Hero / Homepage Images

What: The Hero or Homepage image welcomes users to the site. This is one of your customers' first touchpoints with the site. Ensure that the homepage is a quality image that balances webpage responsiveness.
Why: Your site needs high-quality images and needs to perform up to the typical webpage loading times.
Where: This image is configured in the Configuration Record for organizations using variations of one of the pre-built SuiteCommerce themes (Posh/Threads/Bridge/Manor/Summit/Horizon).
How to Adjust:
- Navigate to the Configuration Record. (Commerce > Websites > Configuration). Select your Site and Domain, and hit Configure.
- Typically, the first tab is the tab for the selected SuiteCommerce theme. In the case below, it is the “Manor” tab. Navigate to the “Home” Subtab.
- In the “Carousel” section, you may add the Title, Text, and Image URL and configure where the Text populates and its color using the Configuration settings.
- For the Image URL, the user needs to add the image to the proper folder in the File Cabinet specified in the Website Setup Record (the process seen above).
- Once the file is in the File Cabinet, add the Absolute URL from the File in the Configuration Record.

Additional Comments:
- Large, Content-full images can be beautiful, but they can also take a long time to load.
- Another option is to add homepage images through a Site Management Tools (SMT) block on the homepage, which is covered later in this article. See the “SMT Tools Images” section.
SuiteCommerce Info Blocks

What: Infoblocks can help drive users to a certain website section you want to highlight. This could be Commerce Categories, specific brands, or populated item groups.
Why: Depending on how you segment your items, Infoblocks can easily segment your site’s information, making it easier to shop in your store.
Where: These images are changed from the Configuration record.
How to Adjust:
- Navigate to the Configuration Record. (Commerce > Websites > Configuration). Select your Site and Domain, and hit Configure.
- Typically, the first tab is the selected theme tab. In the case below, it is the “Manor” tab. Navigate to the “Home” Subtab.
- Underneath the Carousel, the Infoblocks section surfaces in different groups. Here, you can add the infoblock's Title, the Image URL (after the image is in the file cabinet), and the link location after the user clicks on the infoblock.

Additional Comments:
- Some themes might not natively surface info blocks, and if you want info blocks on your site, a theme developer is needed for this functionality.
SuiteCommerce Footer Icons
What: Footer Icons are icons from other Social Media sites that are often linked in the footer of your site for convenience.
Why: These icons are added so users can quickly get to your Social Media pages and connect with your brands on a deeper level by following you on social media platforms.
Where: These icons are configured in the Configuration Record. The native icons include Pinterest, Facebook, YouTube, Instagram, and X/Twitter.
How to Adjust:
- Navigate to the Configuration Record. (Commerce > Websites > Configuration). Select your Site and Domain, and hit Configure.
- Typically, the first tab is the selected theme tab. In the case below, it is the “Manor” tab. Navigate to the “Footer” Subtab.
- Halfway down the page is a section titled “Social Media links”.
- Here, you add the icon name (make sure all are lowercase with no spaces here – failure to do so will fail to render the Social Media Icons), the Text to display, and the URL.
- Though these are less common, you may also specify a data touchpoint, data hashtag, and data target.

Additional Comments:
- These files are often buried and hard to find in the source code. For simplicity's sake, I recommend using the native Icons.
- If you want to add an icon to the footer in addition to the five native icons, this custom solution often requires an extension or a theme developer.
Item Images for Display on PLPs and PDPs

What: Item Images are added to the store so the user knows what he or she is purchasing. Item images are linked on the Item record in NetSuite, and thumbnail images surface on the PDP, PLP, and the cart.
Why: If a person is going to purchase an item from your store, he or she should have an idea of what that person is purchasing.
Where: This is configured in the Website Setup Record and the file cabinet. Once properly linked, the image will link to the item record in NetSuite and surface to your store.
How to Adjust:
This process is spelled out in the article "Adding Images to Item to Show in SuiteCommerce Website". It will walk you through the exact process of linking images and items in NetSuite to surface on your store.
For more information on how you can make the most of your SuiteCommerce PDPs and PLPs, check out these articles on Crafting an Ideal PDP in SuiteCommerce and Optimizing Your SuiteCommerce PLP!
Additional Comments:
- This area can cause a lot of frustration because if even one character is off when naming an item image, then NetSuite will not link the image to the item.
- Ensure no spaces are used when naming images, as the site will publish these images as URLs. URLs cannot successfully publish a space as a site – I recommend using underscores “_” or dashes “-“ depending on your delimiter.
- Review your naming convention and delimiters every time you add an item image. This will prevent headaches down the line and allow you to add your item images effectively.
Want an easier way to upload and name your SuiteCommerce item images? Check out the Drag-and-drop Item Images extension for SuiteCommerce!
Note on Image Sizing: In the Website Set Up Record (Commerce > Websites > Website List), the Admin can limit how the site sizes your images. This section sets the maximum height and width for the site’s images.
One thing to note is that if the image is less than the maximum height, it will render to that less-than-maximum size, making your site’s PLP look like a jigsaw puzzle. For this reason, it is recommended that your site images be made at a square ratio.
To learn more about SuiteCommerce image sizing, check out this tutorial article on How to Set Up SuiteCommerce Image Sizing!

Website Set Up Record > Images Tab
Site Management Tools (SMT) Images

What: SMT Images can be utilized for easy end-user implementation to change your website's pages, content, and images. This does not require a developer and can be edited on the front end of the site.
Why: SMT Images can help NetSuite Admins add images to custom pages or supplement the native SuiteCommerce appearance.
Where: These images are added to the SMT console on the site rather than the file cabinet.
How to Adjust:
Only the Admin, Store Manager, or a custom role with access to Site Management Tools can add these SMT images.
- Ensure that the Site Management Tools Feature is enabled.
- Setup > Company > Enable Features – Validate that the “Site Management Tools” are checked.

This is found in the Web Presence Tab
Want a refresher on enabling features? Check out this tutorial article on Enabling Features in NetSuite.
- In the Configuration Record, validate that the “Hit Escape button for Site Management Tools” button is checked.
- Commerce > Websites > Configuration – Integrations Tab; Site Management Tools subtab.
- Validate that “Use Site Management Tools” is checked and “Disable ESC key to login” is not checked.
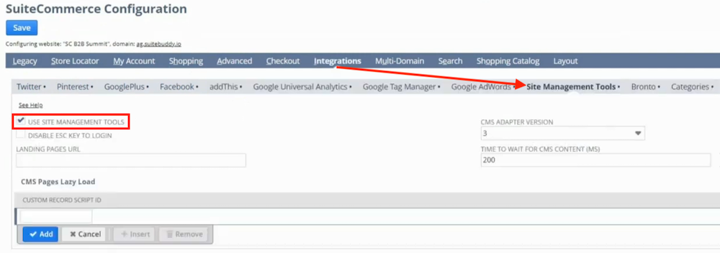
- Validate that the Bundle “SMT Core Content Types” is installed and activated on your site.
- To install the bundle.
- Searching for the “SMT Core Content Types” bundle.
- To activate this bundle, follow the steps in the Activating the Extension Manager article.
- Navigate to the store page where you want to add the SMT images. Hit the “Esc” button on your keyboard and add NetSuite credentials.
- Select the Pencil Icon at the top middle of your screen, then the “Plus” icon at the top right corner to open an options panel.

- Select the CMS Image box and drag it to a blue box on the site.
- From here, you can configure which image you want to upload to the CMS block. Add relevant alt text or metadata to the image for better searchability and SEO responses.
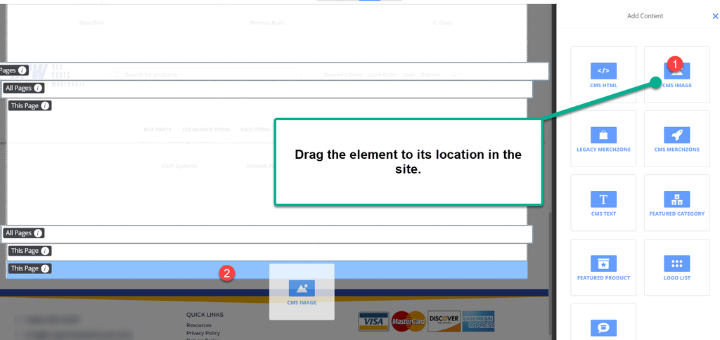
- Save the CMS block, and be sure to publish the changes.

Additional Comments:
- If you cannot see your changes live on your site, double-check that the changes are published.
- A site should not be laden with Site Management Tool content blocks. If your site has many SMT blocks, it is highly recommended that you have a theme developer make theme changes rather than bandaging it.
Commerce Category Images
Commerce Category Images
What: The above images surface when the site’s user navigates to the second or third-level Commerce Category.
Why: Commerce Category Images are added to help the user navigate to the correct grouping of items on the site.
Where: To adjust the Commerce Category Images, you need to utilize the File Cabinet and the Commerce Category record in NetSuite.
How to Adjust:
- Add the desired Commerce Category Image to the specified folder in NetSuite. The specified folder should be determined in the Website Setup Record in the images tab.
- To add an image file to the file cabinet.
- Be sure not to include any spaces when naming your image!

Commerce > Websites > Website List – Select Image Folder
- Navigate to the Commerce Category Record.
- Commerce > Content Management > Commerce Categories – enter the desired Commerce Category.
- In the “Thumbnail Image”, select the desired image for that Commerce category.

Commerce > Content Management > Commerce Categories – Thumbnail Image
- Save the Commerce Category Record and perform a Cache Invalidation Request. Hard refresh your site (Ctrl + Shift + R), and you should see your changes surface.
For more information on working with Commerce Categories, check out the SuiteCommerce Category Images Tutorial!
Additional Comments:
- Finding the correct folder for your commerce category images is the most challenging part of this process. To ensure accuracy, work slowly in the file cabinet.
Payment Method Visuals

Example of a Payment Visual
What: These Payment methods are required for a credit or debit card purchase through SuiteCommerce Standard or SuiteCommerce Advanced. These are the “Visa” and “Mastercard” (etc.) icons used in checkout.
Why: These are required to be added to the NetSuite record for the specific payment visuals.
Where: These are added to the Payment Method in NetSuite.
How to Adjust:
- Add a folder within the File Folder where your site's images are stored. Refer to the Website Setup Record for the default folder from the Commerce Category Images.
- Edit or create a New Payment Method and navigate to the “Payment Visuals” tab.
- Navigate to Setup > Accounting > Setup Tasks > Accounting Lists and select the method you want to edit.
- In the “Flags” Column, add “web/standard” and the relative URL of the Payment Visual from the File Cabinet.

- Cache Invalidation Request and Hard Refresh the site (Ctrl + Shift + R). Then, navigate to the checkout, and the payment visual should surface.
For more information on how to set up payment methods for use on your SuiteCommerce site, check out this SuiteCommerce Payment Method Setup tutorial article!
Store Locator Icons
What: The Pin and the Locator icons above come standard with the NetSuite SuiteCommerce bundle. These can help illustrate the location of nearby stores and the user’s entered location.
Why: These icons are important because they allow users to learn more about nearby stores.
Where: These icons are stored in the File Cabinet and the Configuration Record.
How to Adjust:
- In the File Cabinet, navigate to the following folder:
- Web Site Hosting Files > Live Hosting Files > SSP Applications > NetSuite Inc. - SCS > SuiteCommerce Standard > default > img.
- Here, you will find files titled “default-marker.png” (which marks the user's location) and “position-marker.png” (which marks the store's location). If you would like to add custom icons, replace the files.
- Select “Save” the File Cabinet.

Here is the file path for the Native Store Locator Icons
- In the Configuration Record, the Admin or Store Manager needs to add the above files to the “Icons > Store” for the “Default marker” file and the “Icons > Position” for the “Position Marker” Files.
- Save the Configuration Record, Commit a Cache Invalidation Request, and Hard Refresh your site.

Commerce > Websites > Configuration
For more information on working with the Store Locator, check out this tutorial article on the Native SuiteCommerce Store Locator Setup!
Image Not Found SuiteCommerce Placeholder
What: This image is used when NetSuite cannot find the image associated with the item.
Why: These images show the customer that the site is still a work in progress and can help assure customers that they are on the correct site.
Where: This image is added in the File Cabinet and the Configuration Record.
How to Adjust:
- In the File Cabinet, follow the below click path to find the correct folder:
- Documents > Files > File Cabinet
- Web Site Hosting Files > Live Hosting Files > SSP Applications > NetSuite Inc. - SCS > SuiteCommerce Standard > default > img
- Edit or Add the file and select “Save”.

File Cabinet View of the NoImage.jpg
- In the Configuration Record, the Admin or Store Manager needs to add the above files to the “No Image Found” in the Layout tab.
- A relative URL may be used for the last few folders (screenshot below).
- Save the Configuration record, Cache Invalidate, and hard refresh the site; you should see your changes!

Layout Tab in the Configuration Record
For more information on working with NetSuite Item Images, check out this tutorial on Adding Images to Items for Display on SuiteCommerce!
Additional Comments:
- Sometimes, specifying the relative URL can be challenging – if needed, try adding the absolute URL in its place.
404 Page Not Found
What: A 404 page is rendered when the URL is mistyped, the page does not exist, or the browser cannot pull the request page.
Why: This page surfaces to alert the customer that there is no content on this page, and they should return to the last page where there was content.
Where: This image is added in the File Cabinet and the Configuration Record.
How to Adjust:
- In the File Cabinet, follow the below click path to find the correct folder:
- Documents > Files > File Cabinet
- Web Site Hosting Files > Live Hosting Files > SSP Applications > NetSuite Inc. - SCS > SuiteCommerce Standard > default > img
- Edit or Add the file and select “Save”.
- In the Configuration Record, the Admin or Store Manager needs to add the above files to the “Background Image” in the Theme’s tab, 404 Page Subtab.
- A relative URL may be used for the last few folders (screenshot below).
- You can also configure the text, font color, HREF, and title for the 404 page here.
- Save the Configuration record, perform a Cache Invalidation Request, and hard refresh the site. You should then see your changes.

Additional Comments:
- Be creative! This could be an opportunity for customers to laugh and bring them closer to your brand.
Author: KC Daniels
Got stuck on a step in this article?
We like to update our blogs and articles to make sure they help resolve any troubleshooting difficulties you are having. Sometimes, there is a related feature to enable or a field to fill out that we miss during the instructions. If this article didn't resolve the issue, please use the chat and let us know so that we can update this article!
FREE SuiteCommerce Book
If you liked this article, you'll LOVE our book on SuiteCommerce! Order the free SuiteCommerce book today, and we'll even pay for shipping!
Oracle NetSuite Alliance Partner & Commerce Partner
If you have general questions about SuiteCommerce or more specific questions about how our team can support your business as you implement NetSuite or SuiteCommerce, feel free to contact us anytime. Anchor Group is a certified Oracle NetSuite Alliance Partner and Commerce Partner equipped to handle all kinds of NetSuite and SuiteCommerce projects, large or small!

We are a premium SuiteCommerce agency that creates powerful customer portals. Unlike our competitors, we have already solved your problems.