SuiteCommerce Congifuration
To begin with, we need to ensure that everything is configured correctly. So, we'll navigate to Commerce > Websites > Configuration.
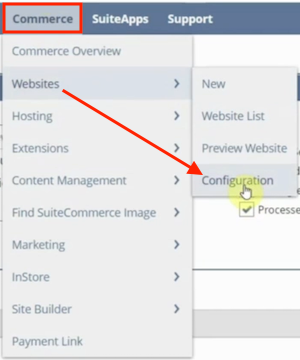
We will click on the website we're using and then check the Site Management Tools configuration to ensure we have SMT turned on for our account.
On the SuiteCommerce Configuration record, we'll navigate to the Integrations tab, then go to Site Management Tools, and from there, check the 'Use Site Management Tools' checkbox.
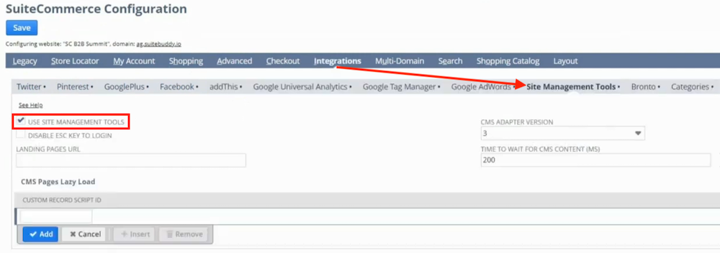
From this page, you can check the 'Disable ESC Key to Login' box to disable access to Site Management Tools directly through the website using the ESC key. However, we prefer to leave this unchecked to enable quicker access.
Logging into SMT
If managing the design of your SuiteComerce website is one of your primary tasks and you expect to use Site Management Tools on a daily basis, you'll want a quick way to access SMT. There are a couple of quick ways to log in to SMT.
Access Using ESC Key
As mentioned above, you can access SMT using the escape key if you have that setting enabled. Simply navigate to any page of your SuiteCommerce website and press the ESC key. This opens a page where the user is prompted to enter their NetSuite login credentials.
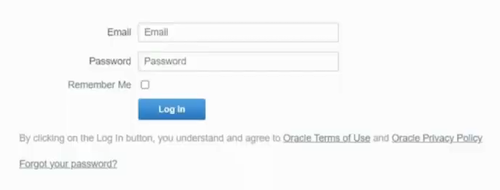
Remember that not everyone with access to the NetSuite user interface can also access Site Management Tools. If you cannot log in to SMT, contact your administrator about gaining access.
Want to learn more about NetSuite user access limits? Check out this tutorial on NetSuite User Roles & Permissions.
Access Through the SMT Links Portlet
If you prefer to open up Site Management tools from the NetSuite UI instead of navigating to the website each time, you can set up the SMT Links portlet on your NetSuite dashboard. This keeps the SMT login link at your fingertips in NetSuite so you can easily access it throughout the day.
Want to learn more about using portlets for quick navigation? Check out our tutorial article on Customizing NetSuite Dashboards.
SMT Navigation
After a successful login, we're in Site Management Tools. From here, you can use drag-and-drop components to customize your website's design.
View Mode
When you first log in to Site Management Tools, you'll notice it starts you in view mode. From here, you can see and navigate through your website while having some additional tools available.
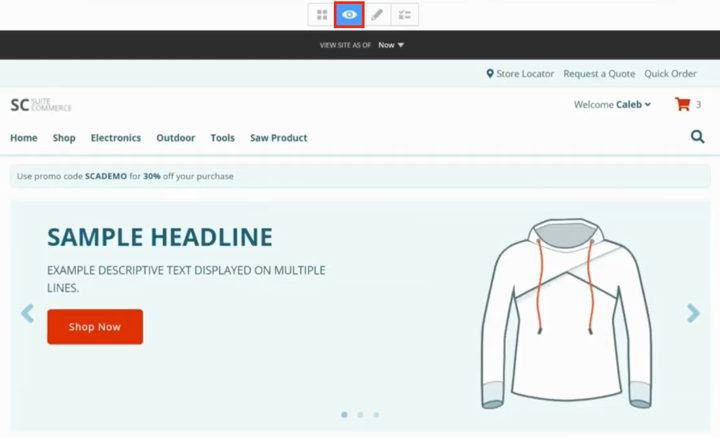
For example, you can see how your website page looks now or view how it will appear on another date based on content visibility rules (which we will address in more detail later in this tutorial).
There are four primary modes in Site Management Tools:
- Overview Mode
- View Mode
- Edit Mode
- Review and Publish Changes
SMT Overview Mode
Overview mode is where you can see your website's different categories, pages, blog posts, published content, and expired content. Each area is organized into its own dedicated tab.
Overview: Categories Tab
The Category tab allows you to look at the commerce categories you have set up for this website.

From here, you can expand each category to see its subcategories. You can also view the number of items in each category and even associate items with commerce categories directly from this tab.
Overview: Blog Tab
If the blog extension is enabled, you'll be able to create blog posts for your SuiteCommerce site from within SMT as well. As you begin using this feature, you will manage all your blog posts from the blog tab. We won't cover blog posts in this tutorial, but you can check out our article on Publishing a Blog Post on Your SuiteCommerce Site to learn more.
Overview: Published Content Tab
This is where you can view all the content published on your SuiteCommerce Site. It's a handy place to look for a specific piece of published content since you can quickly search by visibility, content type, path, or tag.
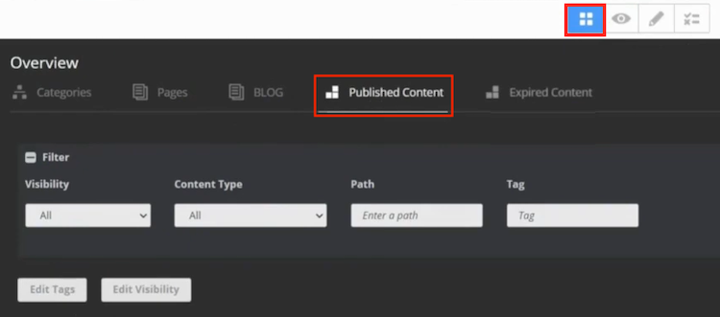
You can also edit content visibility and tags directly from this published content tab.
Overview: Expired Content Tab
This is the tab where you can find any previously published content that has since expired. You likely won't visit this tab much to start, but as you work more with content visibility dates, this tab comes in handy.
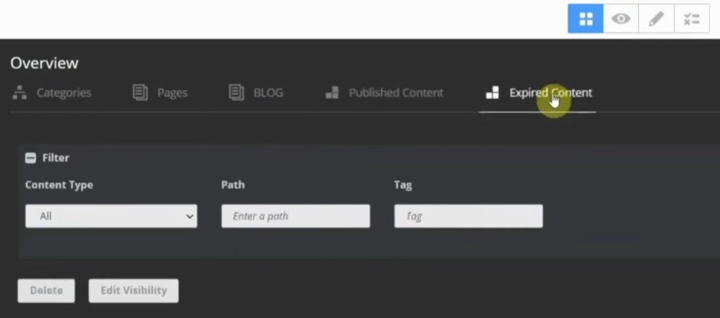
For example, you may design a holiday promo element for your site that you set to expire on a certain date. After the content element expires, you can find it on this expired content tab, make any necessary edits, and re-use it for your next promo rather than building a whole new element from scratch each time.
Drag and Drop Components
Next, let's look at a handful of elements in Site Management Tools to introduce what's possible. To begin with, we need to go into edit mode and click on the blue plus icon in the upper right corner.

This will open a menu of drag-and-drop components. You'll notice that the page view now has a shadow overlay and that light boxes indicating content areas appear with visibility designations.
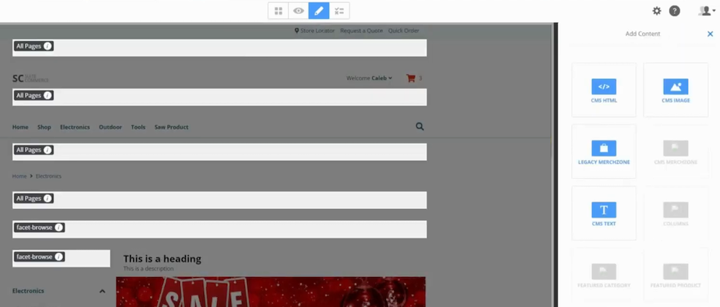
Available drag-and-drop elements display as blue icons in the content menu on the right-hand side of the screen. If certain content elements are disabled or hidden, the extension is not activated for this domain. If you don't have that extension available, you'll have to download and set up the bundle.
Need a Refresher on Activating Bundles? Check out our tutorial on How to Search and Install Bundles in NetSuite!
Custom Content Types
If you don't have a drag-and-drop content piece that you wish was there, our NetSuite Developers can develop custom content types for you! We build an extension for a custom content type that is a unique component specific to your business and how you want it to look and feel, including the different elements you want to be configurable. So, you can create additional components beyond what is out of the box if you want something more than what's offered natively.
Drag and Drop Text Box Element
Now, let's drag and drop in an element. I'm going to drag and drop a CMS text element.
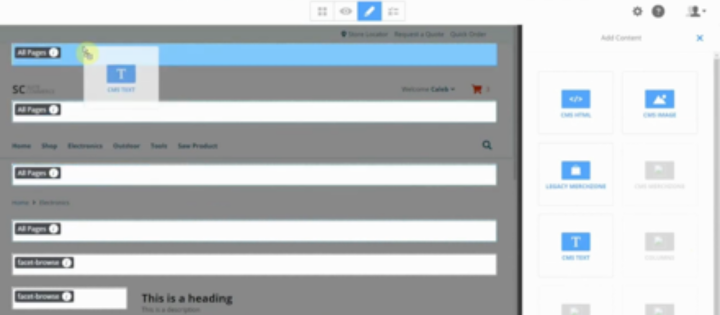
Remember to check the area you are dragging and dropping an element into to ensure the theme component will display on the pages you want it to. In our case, this CMS text element will display in the header on all pages, but there are several locations across the page with different designations, such as 'This Page'. So, let's go ahead and drag and drop a text area to all pages.
Additional Theme Components
We can add additional theme components to drag and drop in other locations. It's a single line of code that we drop into the theme, so if you want additional areas to drop in, ask our team to support you by adding more of these along your implementation. Whether for all pages, this page, or whatever you want that to be by default, the theme has many of these areas, but we can add as many as you want.
Component Settings
After dragging and dropping in a component like the CMS Text element, a menu will display on the right-hand side of the screen where you can establish some settings.
We recommend giving each component an easily identifiable name so you can locate it later in SMT. For this example, we'll say "Cyber Monday deal 2022."
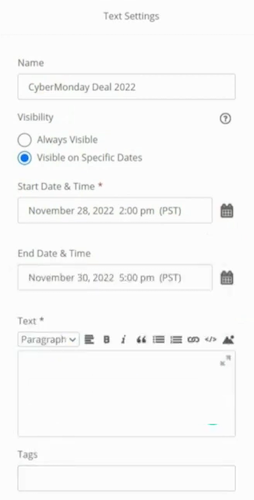
In this example, we use this text element to create a header note about a time-bound promo code. We don't want this message to display after the promotion is over, and we also don't want someone from our company to have to manually remove the element at a certain date and time. Instead, we can easily manage this by establishing a visibility timeline around this element that matches the time window of our promo code. Let's say we want it to end at 5:00 PM on the 30th.
Want to learn more about working with SuiteCommerce promo codes? Check our our tutorial on SuitePromotions to learn more!
Now, we just need to type the text we want to display. In this case, that is "Cyber Monday deal 2022 - 75% Off Total All Orders." Then I'm going to click 'Save,' and you'll see that that text shows up.

If I go into the view-only mode, it will also appear there. We can add an HTML area and further style this, but for this demonstration, we will use plain text.
Publishing a Site Element on an Existing Page
This element we just created is not yet live on the website; I'm still within the CMS tool. If I go back to the regular website in my browser and navigate to this page, the information is not showing:

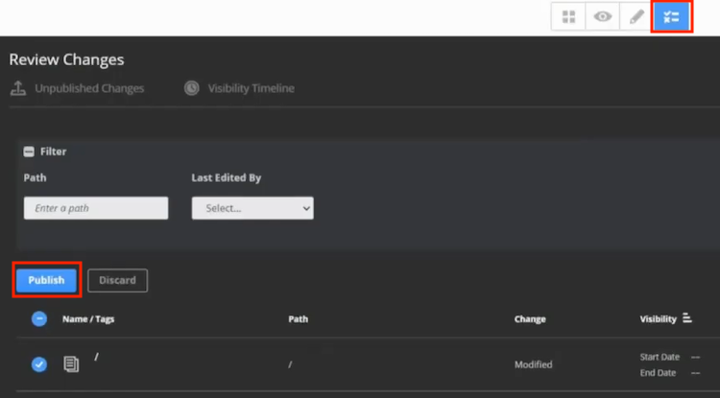
So, let's return to site management tools and go to Review and Publish Changes. We'll select the text component that we just created and click 'Publish.'
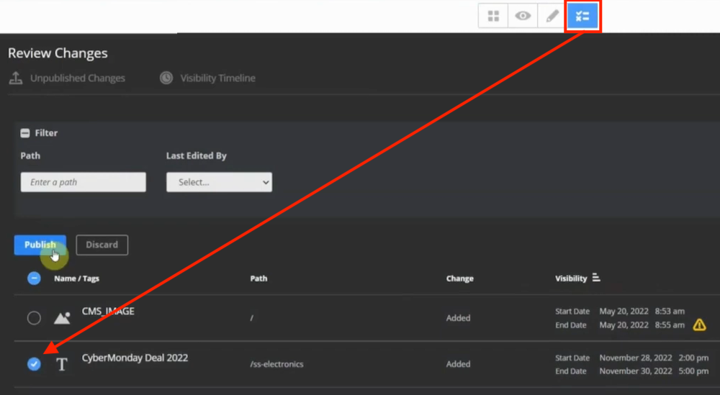
Now, the text will be visible if we navigate back to the live site.
Previewing Site As Of Specific Dates
Setting visibility dates, as we did above, is handy because you don't have to manually publish/delete elements at specific times. When working with visibility dates, you can preview what a page will look like at specific dates and times by using the "View Site As Of" menu at the top of the page in SMT view mode.
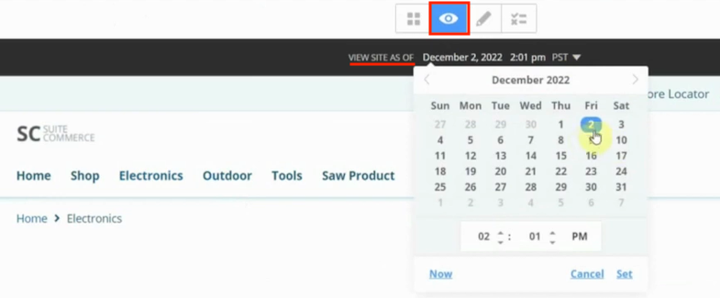
This is a nice tool, especially if you have elements appearing/disappearing from your site in overlapping time frames. You can use this preview feature to see how the page will look on different dates and understand how your different time-bound elements appear together on a page.
Adding Code to Header
Another example of something you could do with site management tools is add things to the website <head> element, like a live chat feature you want to integrate. Let's take that as our example here.
To maintain consistency, it's best to add this information directly on the home page. To do so, we'll open the website's home page in edit mode within site management tools, click on the menu option at the top right corner of the screen, and then click on 'Edit Page Settings'.
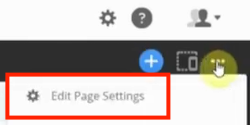
We will copy the script tag provided for integrating the live chat, go to the Advanced tab in the page settings menu, and paste the code into the Add to <head> field.
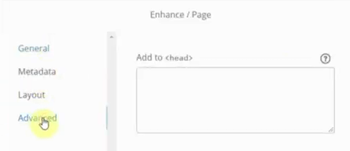
After pasting in the code, we'll click 'Save' to keep the changes to this element. Then, we'll go into Review and Publish Changes, select the element, and click 'Publish' to publish it.
Now, if I navigate back to the live version of the website and press Control + Shift + R to refresh my browser, the live chat button I just added will show up.
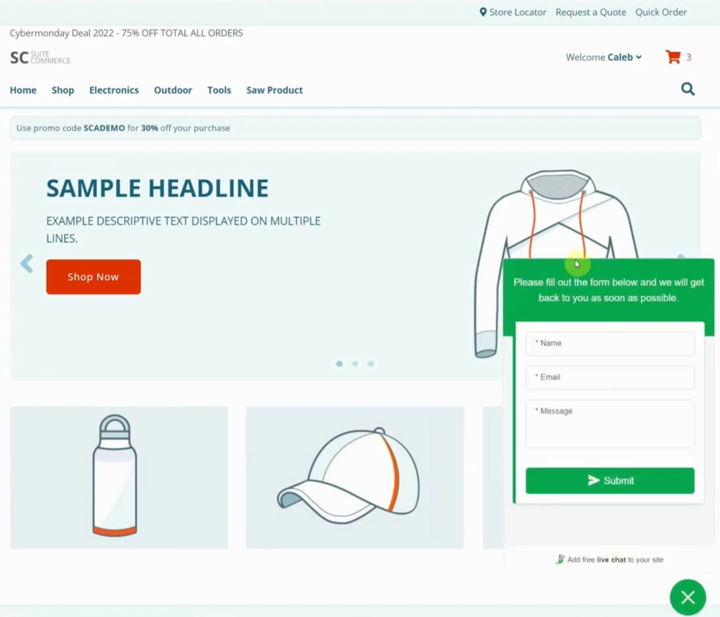
This doesn't mean it's integrated with the ERP; all we did was add this chat feature to our website using the integration script they provided.
Item Data Management
The next thing to address in an overview of SMT is its item management capabilities. It's a good idea to develop good practices for managing your information via SMT versus the ERP early on.
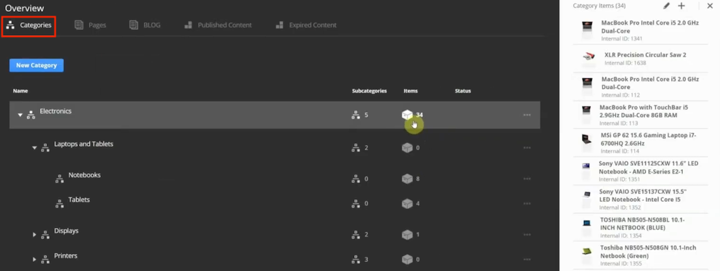
Even though there's the option to manage categories and items directly from site management tools, it's generally better to manage that information directly out of NetSuite on the item records or the commerce category level.
Need a refresher on managing items and categories in NetSuite? Check out our article on Working with Commerce Categories!
Remember, while there are several tools in SMT that you already have processes for within the NetSuite UI, site management tools are required and much more manageable in certain use cases, such as when creating landing pages.
Creating a Landing Page
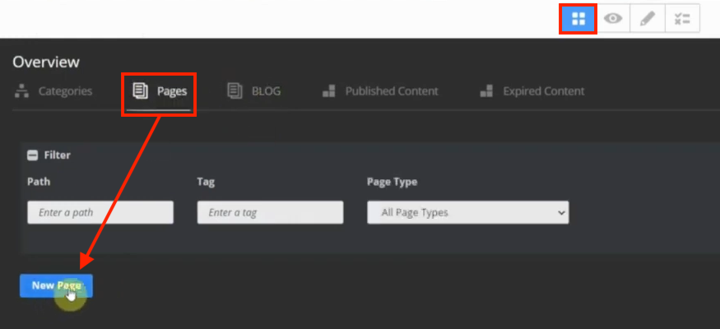
Let's go ahead and create a new landing page. I will go back to Site Management Tools and click on the Overview icon. Then I will navigate to Pages and click 'New Page'.
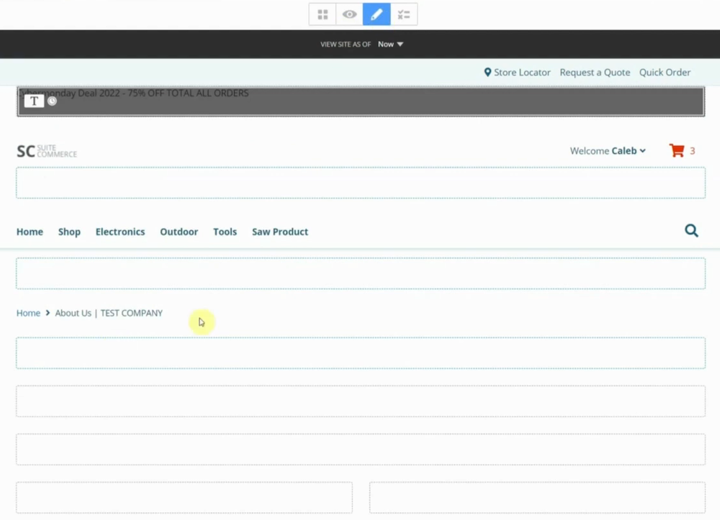
This will open a new landing page in edit mode, with areas outlined for dragging and dropping different content elements.
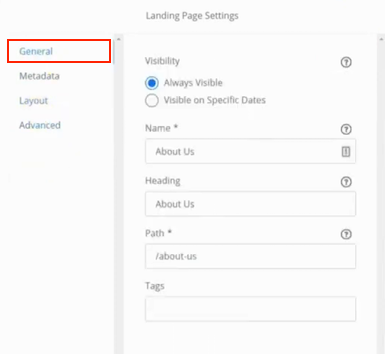
Landing Page Settings: General Tab
I'm going to work on the settings first. For the visibility timeframe, I am going to select Always Visible. This will be an about us page, so I'll type that in as the page title, and it will auto-fill the URL.
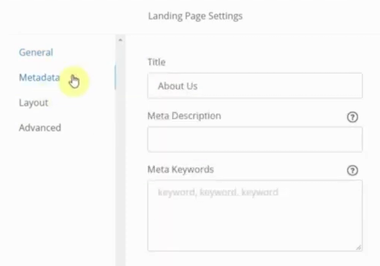
Then, we'll look at the metadata data. This title and the meta description will appear on page previews and in search results. You can also add meta keywords on this tab.
Then, we can add some advanced information, but we'll skip that since we just looked at it with the chat feature example. As soon as you are ready, you can click Save.
So, saving the settings described in this section creates a new URL, but then we still need to add content.
Editing a Page in SMT
Now, I'll show you one more way you can navigate to a page to edit it and build it out further with drag-and-drop elements. If you want to edit a page you already created, go to Overview mode, click on the Pages tab, locate the page, and click the 'Edit' option in the drop-down menu.
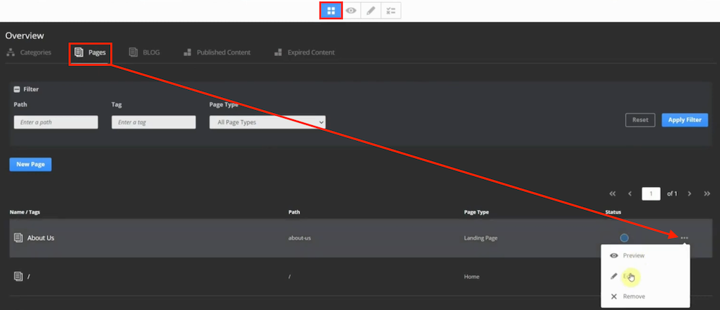
This will open the page in edit mode. Here, you can click on the blue plus icon and drag and drop different components onto this landing page.
Key Takeaways
In summary, site management tools are handy as a drag-and-drop method for customizing your SuiteCommerce website. It's not the best tool out there for CMS-only solutions, but site management tools allows you to bridge the gap for basic things you need to add to the website. SMT enables you to do more on your own without reaching out to a developer.
Certain changes don't need to be built within the core architecture of your item structure or commerce category. Other times, you may have one-off scenarios where you want to show this particular piece of information for this specific product detail page and no other product pages. Those are the primary use cases for site management tools and scheduling content; otherwise, you should be able to use commerce categories and item records to control almost everything else.
Well, that's it for now! Hopefully, this post gives you something to work with while trying to understand NetSuite and what it can do for your business!
Get stuck in a step during this article?
We like to update our blogs and articles to make sure they help resolve any troubleshooting difficulties you are having. Sometimes, there is a related feature to enable or a field to fill out that we miss during the instructions. If this article didn't resolve the issue, please use the chat and let us know so we can update it!
Oracle NetSuite Alliance Partner & Commerce Partner
If you have general questions about SuiteCommerce or more specific questions about how our team can support your business as you implement NetSuite or SuiteCommerce, feel free to contact us anytime. Anchor Group is a certified Oracle NetSuite Alliance Partner and Commerce Partner equipped to handle all kinds of NetSuite and SuiteCommerce projects, large or small!

We are a premium SuiteCommerce agency that creates powerful customer portals. Unlike our competitors, we have already solved your problems.
