In this tutorial, we will be showing you how to create a custom field in NetSuite. There are many different record types in NetSuite, for instance, Transaction records, Entity records, and Item records. Through this tutorial, we will use the example of adding a custom field to an item record, but the process is the same for other record types.
Note: You will generally need to be in an upper-level role, like an administrator role, to add a custom field in NetSuite.
Custom Item Field Navigation
We'll go to Customization > Lists, Records, & Fields > Item Fields > New.

This will open a custom field record where you can enter the basic information needed to set up the field.
.
Basic Field Settings
The label will be displayed to anyone looking at an item record in NetSuite. Be careful when making this label because you want to ensure that the meaning is clear and that there's not already a similar label on another field on the item record. For example, I know there's already a "Color" field, so I'm going to call this new field "Primary Color" to distinguish between the two fields.
Then we need an ID. You should always start the ID with an underscore because it will be added to a standard prefix.

The owner of the custom item field will default to the name of the NetSuite user you have currently logged in as. However, you can change this if you would like.
Then we need to add a description. This step is often skipped, but it's crucial for promoting data integrity within your NetSuite account. Generally, a simple explanation is sufficient, though you may need a much more detailed description depending on the field type.

Then for simplicity sake, we will grab the description and go down to the Display subtab, where we add it to the Help Text field. So now, if someone is on an item record and clicks 'Field Help' for this custom field we are creating, this will be the help text that appears.

By adding a good field description and clear help text, you're helping out anyone who uses this field in the future and isn't sure what it might be for. In addition, being clear about what data should be entered into any new fields you create will help keep your data clean over time.
.
Field Type/List Record Option
So for this next step, we'll come back up to this main body, and we're going to establish the Field Type.

There are Free-Form Text fields, which are just places where you can type in text, like the label or ID fields.
Note: the character limit on Free-form Text fields is 300 characters. See the Other Available NetSuite Field Types section below to learn what other field type options are available to you if you need to include more characters.
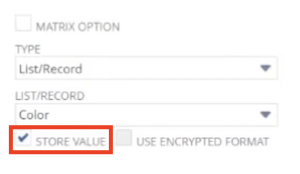
There are also List/Record fields where you can pick other records, list items, or public saved searches from various predetermined options. If you select List/Record as your field type, you must determine what List/Record you're referencing. We'll see if there's one for color already, and there is.

Note: You want to make sure that this custom list is the one you want to be referencing. You can do that by going to Customization > Lists, Records & Fields > Lists to see the options in that list.
Generally, you want to be clicking 'Store Value' for most custom fields to create.

Then if you want the fields to automatically show in a list display of the record it belongs to, you select 'Show in List'. So, for instance, if you're looking at a page of all your items and each item is one line, this field would show as one of the columns by default.

Other Available NetSuite Field Types
In this tutorial, we already talked about Free-Form Text and List/Record type fields. But there are several other field types you may want to work with when creating custom fields in NetSuite. So here is a brief list of additional NetSuite custom field types and their descriptions.
- Check Box fields function like an on/off switch depending on whether the box is checked or not
- Currency fields enable users to enter up to 15 digits and 15 decimal points for currency amounts
- Date allows NetSuite users to enter or select dates to be recorded in the field
- Date/Time fields allow NetSuite users to house date and time values within a single field
- Decimal Number fields allow users to enter up to 20 digits as a decimal number in a custom field
- Document fields allow the user to select a document from the file cabinet to attach to the record that can then be previewed or download
- Email Address fields allow users to enter email addresses, and the field links to open the user's default email program when clicked
- Help field types allow you to include up to 999 characters of help text on record pages
- Hyperlink fields allow you to enter URLs beginning with http://, https://, or ftp:// (max 999 characters) as in-text links (max 10 characters)
- Image fields allow the user to attach an image to a record from the NetSuite File Cabinet (supported file types include but are not limited to .bmp/.gif/.jpg/.jpeg/.pjpg/.pjpeg/.png)
- Inline HTML fields let users define a custom field using HTML (limit 4000 bytes) to be included on custom pages generated by Suitelets
- Integer Number allows the user to enter up to 20 digits as an integer into the field
- Long Text fields are helpful when you need greater than 4,000 characters of text for a text area, and you do not need text formatting
- Multiple Select is just a variation on the List/Record field. The List/Record field only lets you pick one, but with a Multi-Select field, you can select as few or as many options as you want to.
- Password fields are encrypted, limited to 15 characters, and show a fixed number of character placeholders when viewed on a record
- Percent fields allow users to enter integers between 0 and 100 to be displayed as a percent
- Phone Number fields allow users to enter up to 32-character telephone numbers
- Rich Text fields let users enter up to 100,000 characters and provides basic formatting capabilities, including text size, color, alignment, options for bold and italic, bullet points, and numbered list formatting
- Text Area fields allow NetSuite users to enter up to 4,000 unformatted characters
- Time of Day lets users enter a time of day
.
Applies To Subtab
Then we determine the Item Type that this field belongs to. For this one, we will select 'Inventory Items', 'Package Items', and 'Assembly Items', but it depends on what item records you want this field to appear on.

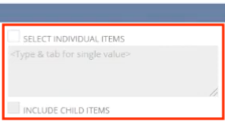
For example, do you want it only to be 'Sale Items', ' Purchase Items', or 'Both'? You can even choose to only have this field show up on specific items by adding those items here by selecting the 'Specific Items' checkbox and adding the items in the field below.

.
Display Subtab
We've already added Help on the Display subtab when we set up the Item Description.
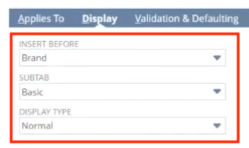
Display Type is essential: Most of the time, you leave this as 'Normal'. Still, you might want to set it to 'Inline Text' in some cases, which doesn't allow the average user to edit the value, so you'll generally only be able to edit the value using a script or a workflow or something like that. So it would be just displayed as read-only.

Subtab tells us where you want the field to show up on the item record. Each item record generally has a main area at the top and several sub-tabs that help you organize the information. Then within the basic information sub-tab, you can determine where roughly this new field will display on the form.
.
Validation and Defaulting
The Validation & Defaulting tab provides several options that you can use to promote data integrity within your NetSuite Account. For example, you can set the field you are creating as Mandatory.

Depending on the type of field you are creating, you have the option to Check Spelling of field entries.
Again, depending on the field type you are working with, you may wish to set a Default Selection for the field or even a Dynamic Default that changes based on specified parameters.
Finally, there are a few options related to 'Allow Delete of List/Record Values?' though, in most cases, you will probably want this set to 'Prevent and Return Error' to preserve data integrity throughout your account.
Sourcing & Filtering
This has a variety of applications depending on the type of field you are creating, and frankly, we could write a whole tutorial on this subtab alone. So, we will just briefly review some of the options here.

Options from the Sourcing & Filtering subtab generally aren't needed for most fields. However, there are specific cases where these come in handy. For example, if, sticking with our item color field example, we were creating a field for matrix item color options, we would need to use the Source List field to choose the option that references the record that we want to pull information from. Then using the Source From field, we can select the field that contains the value we want to reference.
If you would like to filter down your source list options that the users see when entering data for a multiple select or List/Record field, you can use the Source Filter By and Filter Using fields to accomplish this.
Access Subtab
If you aren't familiar with NetSuite Roles & Permissions, the terms associated with the fields on this subtab will be familiar. Like the options on the Validation & Defaulting subtab, these fields can help promote data integrity within your NetSuite account.

You can set a Default Access Level (such as viewing or editing the data) for the field and a different Default Level for Search/Reporting. This way, you can manage the default for how users interact with the field data on the item record versus in a list view, such as in a saved search or report. Finally, you can set specific access rules for different Roles, Departments, and Subsidiaries. Remember that the default access level will be used for any Roles, Departments, or Subsidiaries where you do not specify an access level.
.
Translation Subtab
The translation tab is pretty self-explanatory. If you have enabled the Multi-language feature in your NetSuite account, you can manually enter a translation for your custom item field label or field-level help text on this subtab.

Saving your Custom Item Field
OK, then we click 'Save' on our Custom Item Field record, and we're done!
That's how you create a custom item field! I should now be able to see this field on the item record and in this list of custom item fields. So if I press CTRL+F and search for "Primary Color", you can see there it is in the Custom Item fields list (which is located under Customization > Lists, Records, Fields > Item Fields).

Can't set/Change ID of custom field or record
Is the ID field or the Change ID button missing?

If you are having this problem, it is likely an Enable Features issue. You should be able to resolve this issue if you enable these features:
- CREATE BUNDLES WITH SUITEBUNDLER
- SUITEFLOW
- SERVER SUITESCRIPT
- CLIENT SUITESCRIPT
- CUSTOM RECORDS
That's all for now! Hopefully, this post gives you something to work with while trying to understand NetSuite and what it can do for your business. If you have any questions and want some free consulting advice, feel free to contact our team at Anchor Group.
Get stuck in a step during this article?
We like to update our blogs and articles to make sure they help resolve any troubleshooting difficulties you are having. Sometimes there is a related feature to enable or a field to fill out that we miss during the instructions. If this article didn't resolve the issue, please use the chat and let us know so that we can update this article!
