There are several different types of promotions you can create in NetSuite to give customers deals like discounts on items, free items with certain purchases, free shipping, etc. This article is a step-by-step guide for creating a promotion in NetSuite that gives the customer a percentage discount on certain items.
Prerequisite: Creating a Discount Item in NetSuite
A discount item record sets the discount rate for accounting purposes. If there is not already a discount item record in your NetSuite environment, you will need to create one before making the item discount promotion.
Creating a Discount Item: Step-by-Step
Step 1: Navigate to Lists > Accounting > Items > New.
Step 2: Select the item type “Discount”.
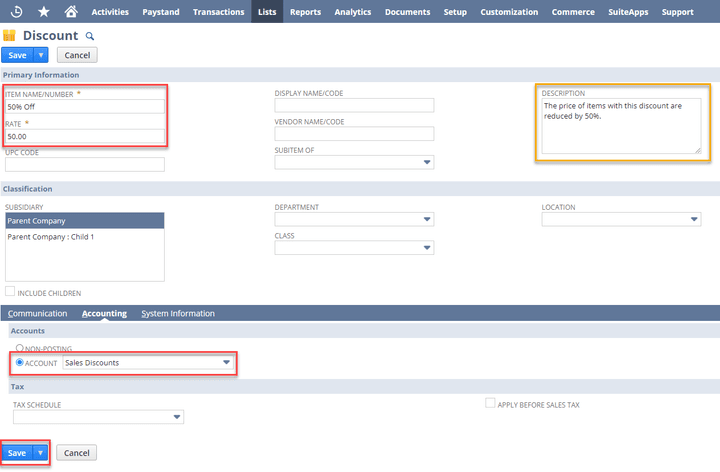
Step 3: Fill out the “Item Name/Number” field with a descriptive and concise name.
Step 4: In the “Rate” field, enter the amount off the customer will receive on the item.
Step 5: In the “Accounting” subtab, fill out the “Account” field
Optional: Fill out any other relevant fields. It is recommended to add a description.
Step 6: Click “Save”.
Here is an example screenshot of a discount item record in NetSuite set up to give customers 50% off.

Creating an Item Promotion in NetSuite
Step 1: Navigate to Lists > Marketing > Promotions > New.
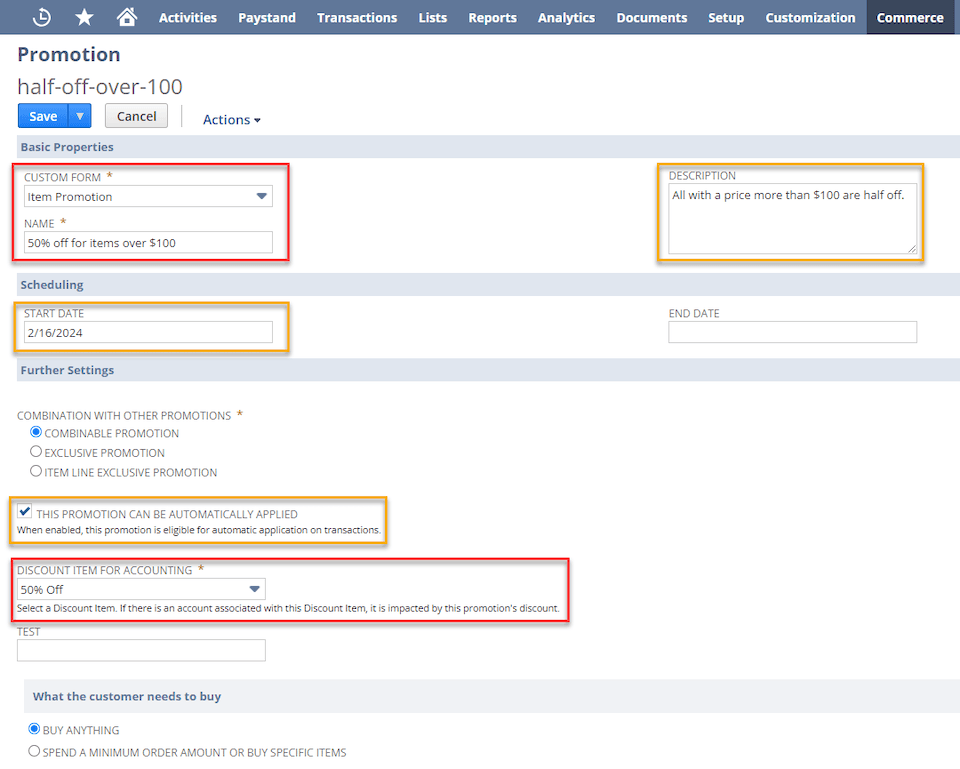
Step 2: In the “Custom Form” field, select “Item Promotion”.
Step 3: Fill out the “Name” field with a descriptive and concise name.
Optional:
- Fill out any other relevant fields. It is recommended that a description and a start date be added.
- Check the “This Promotion Can Be Automatically Applied” box if you want it to run automatically.
Running into issues with discounts not automatically applying to transactions? Check out this problem-solving article, on how to resolve when SuitePromotions Set to Auto-Apply are Not Applying to Transactions.
Step 4: In the “Discount Item For Accounting” field, select a discount item. (If you need to make a new one, follow the steps in the dropdown of the above section.)

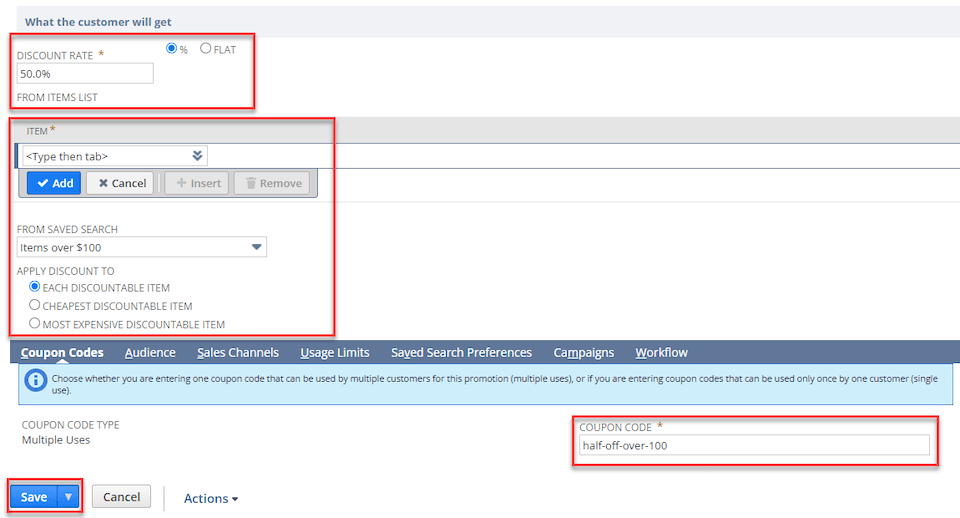
Step 5: In the “What the customer needs to buy” section, fill out the discount rate and select “%” or “Flat”.
Step 6: In the “Item” section, add specific items and/or use a saved search to include several items. (NetSuite saved searches can be used to filter by various criteria.)
Step 7: In the “Coupon Codes” subtab, enter the name you want for your coupon code in the “Coupon Code” field.
Step 8: Click “Save”.

Got stuck on a step in this article?
We like to update our blogs and articles to make sure they help resolve any troubleshooting difficulties you are having. Sometimes, there is a related feature to enable or a field to fill out that we miss during the instructions. If this article didn't resolve the issue, please use the chat and let us know so that we can update this article!
Oracle NetSuite Alliance Partner & Commerce Partner
If you have questions about how our team can support your business as you implement NetSuite or SuiteCommerce, feel free to contact us anytime. Anchor Group is a certified Oracle NetSuite Alliance Partner and Commerce Partner equipped to handle all kinds of NetSuite and SuiteCommerce projects, large or small!

Tagged with Training
