

In order for a SuiteCommerce webstore to accept payment methods online, a Payment Processing Profile needs to be set up in NetSuite. This process also requires installing a Payment Gateway Integration, which is described from a high level. In this instance, we're looking at how to set up a payment processing profile for Braintree, a PayPal Service, as your Payment Gateway Integration for Suitecommerce.
Prerequisites for Creating the Payment Processing Profile
Prerequisite 1: You need to have an Admin role in NetSuite.
Prerequisite 2: The website and appropriate subsidiaries need to be created before the Payment Processing Profile is created.
Prerequisite 3: You need to select your Payment Gateway Integration and set up your merchant account. In this case, you would need your specific entry keys for your Braintree merchant account.
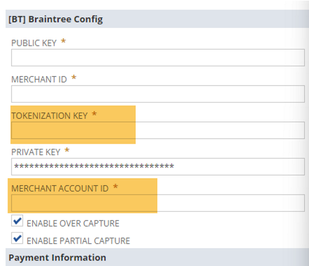
You should have the following:
- Merchant ID
- Merchant Account ID
- Public Key
- Secret Key
- Tokenization Key
- The desired bank accounts where funds should be directed.
Prerequisite 4: You must also establish a merchant account with your bank (if you haven’t already) and be in NetSuite.
Prerequisite 5: Research documentation for their Payment Gateway Integrator and its connection to NetSuite.
Establishing the Payment Gateway Integrator
In NetSuite, navigate to Payment Processing Profiles and select the blue button, New Payment Processing Profile. Then, follow the click path: Setup > Accounting > Payment Processing Profile.
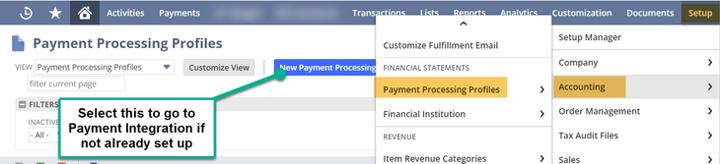
Setup > Accounting > Payment Processing Profile
NetSuite will surface the Payment Gateway Integrations page – select the desired gateway by selecting “Install”.

NetSuite will then direct you to the SuiteApp section to install the Braintree app. Once you select the Blue button to install, NetSuite verifies that the Chargeback Workflow bundle has been installed in the environment.

To install bundles, search for the bundle “Chargeback Workflow” or ID 127355.
Need a refresher on finding bundles in NetSuite? Check out this tutorial article on How to Searc h & Install Bundles in NetSuite!

After the Chargeback workflow and the Braintree SuiteApp are installed, you will be directed back to the Payment Gateway Integrations page and able to select “Enable & New.”
This should redirect you back to the Payment Processor Page, where you once again click “New Payment Processor Profile,” and a page similar to the screenshot below will be present.

Inside a Braintree Payment Processing Profile
Add the appropriate website, name, subsidiaries, currencies, payment methods, and keys in the appropriate sections of this record.
Upon selecting Save, the Payment Processing Profile is completed.
Author: KC Daniels
Got stuck on a step in this article?
We like to update our blogs and articles to make sure they help resolve any troubleshooting difficulties you are having. Sometimes, there is a related feature to enable or a field to fill out that we miss during the instructions. If this article didn't resolve the issue, please use the chat and let us know so that we can update this article!