
Several companies have approached our team over the years with the same problem: They have many items that need to be imported into the File Cabinet in NetSuite, and they don't want to add each image file individually. “Isn’t there an easier way to add multiple images at once into NetSuite?” The answer is YES!
This article outlines how to utilize the Advanced Add feature in the NetSuite File Cabinet.
To learn more about working with NetSuite Item Images, and displaying them on SuiteCommerce, check out this Guide on Site Images that I put together back in September of 2024.
Assumptions
As we walk through these instructions, we will assume that your company has a compressed zip folder of product images that are properly named and that the User has an Admin role.
You may also customize a specific role to add the Documents and Files: Full permission to access the file cabinet.
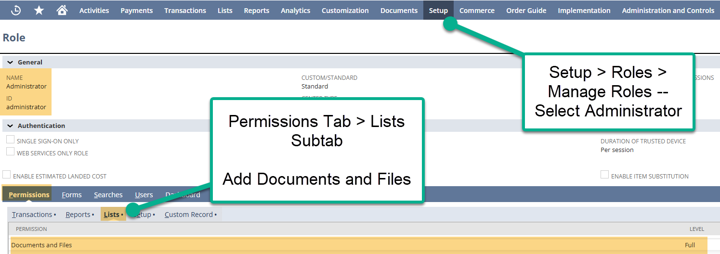
To learn more about configuring role-based permissions in NetSuite, check out the tutorial article on NetSuite User Roles & Permissions, that my teammate Caleb wrote back in November of 2022!
Using "Advanced Add" to Upload Multiple Images to the File Cabinet in NetSuite
Below is an outline of the steps required to access the Website Setup Record, find the Image Hosting Folder, Navigate to the File Cabinet that hosts images, and add the images via Advanced Add.
Step 1: Navigate to the Website Setup Record to find what folder hosts the item images.
- Select Commerce > Websites > Website List and Edit the Website Setup Record you want to view.
- Click on the Images Tab. Here, you will see the Image Domain and Image Folder. This is the key to where your images are stored in the File Cabinet.
- Note the file path for where the images are stored. In this case, it is: “Web Site Hosting Files : Live Hosting Files : site”. It is possible and easy to move or copy files within different folders in the File Cabinet – so do not worry if the Image folder needs to change.

Note the Image Folder from the Website Setup Record
Step 2: In NetSuite, navigate to the Site Folder in the File Cabinet
- Navigate to Documents > Files > File Cabinet.
- Once in the File Cabinet, follow this path: Website Hosting Files > Live Hosting Files > Site.

Select the Blue Advanced Add button
- Select the Blue Advanced Add button. In the “Zip Archive to Add” field, choose your compressed zip folder of product images. Next, select the “Add & New” button.

- To verify the descriptions and images are added to the inventory record, navigate to the item record > Webstore tab. Verify there are images in the Associated Images subtab.

Success! Images are added via Advanced Add
A Helpful Tool: Advanced Renamer
Often, Image files are improperly named if they are coming from another ecommerce platform or a Vendor. One customer introduced us to this Advanced Renamer tool that they found helpful for renaming images quickly and efficiently.
Below are instructions on how to operate it, and linked here is the Advanced Renamer User Guide.
Note: In small sample sized tests, this software has seemed to work as expected and smoothly. As of the publish date of this article, our team here at Anchor Group is actively working with the Advanced Renamer tool on a client project for the first time. We have had a positive experience with it so far, so we are sharing it here for you to try if you would like to. However, we do not at this time reccomend it with full confidence as we have yet to fully vet the solution.
Step 1: Download the Advanced Renamer. This software takes the original file from a Zipped folder and can quickly update image file names.
Once downloaded, continue through the following steps to operate the file renamer to the proper item name formatting.

Step 2: Click File in the top left corner. Add the file you would like to bring in.
Step 3: In the right column, under Filename, click the checkbox next to the item to select it.
Step 4: At the bottom of the left column, select the “List Replace” Option.
Step 5: Still in the left column, in the ‘Text to be replaced’, validate that is the old file name.
Step 6: In the ‘Replace with’ field, add what you want the new image name to be, ensuring that it matches your image naming conventions. If there are multiple images for the same item, remember to use the item delimiter to control for the order in which you want them to display.
For more details on naming item images in NetSuite, check out this article on adding images to items in NetSuite that my teammate Caleb wrote back in November of 2022!

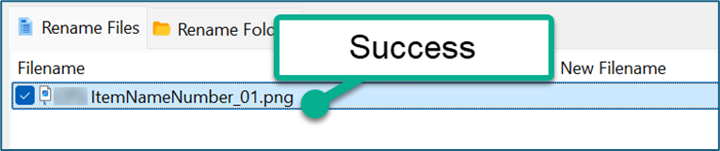
Step 8: Select ‘Start Batch’ in the top right corner, then Start again in the popup that will appear. This should rename the file quickly and efficiently.
Step 9: The file is saved in the original storage location.
Step 10: After the file is renamed, compress the folder as a zip file to upload.
Author: KC Daniels
Got stuck on a step in this article?
We like to update our blogs and articles to make sure they help resolve any troubleshooting difficulties you are having. Sometimes, there is a related feature to enable or a field to fill out that we miss during the instructions. If this article didn't resolve the issue, please use the chat and let us know so that we can update this article!
FREE SuiteCommerce Book
If you liked this article, you'll LOVE our book on SuiteCommerce! Order the free SuiteCommerce book today, and we'll even pay for shipping!
Oracle NetSuite Alliance Partner & Commerce Partner
If you have general questions about SuiteCommerce or more specific questions about how our team can support your business as you implement NetSuite or SuiteCommerce, feel free to contact us anytime. Anchor Group is a certified Oracle NetSuite Alliance Partner and Commerce Partner equipped to handle all kinds of NetSuite and SuiteCommerce projects, large or small!

We are a premium SuiteCommerce agency that creates powerful customer portals. Unlike our competitors, we have already solved your problems.